Great Tools for Beginning Spinners

Note from the SpaceCadet:  My friend Natalie (npeace on Ravelry) is a prolific spinner who creates amazing handspun yarns almost exclusively on spindles.  She’s been kind enough to write about a few of her favourites here.

A while ago, I wrote a bit about resources for a beginning spindle spinner.  Since writing that post, a couple of people have come back to me saying:  That’s all well and good, but what are the actual tools that a beginner needs?

It’s a good question.  One of the appeals of spindle spinning is that it really doesn’t take much.  A spindle is basically just a stick and a weight, in one configuration or another.  Get one of those and add in some fiber – preferably prepared for spinning, but even that’s not completely necessary – and you should be good to go, right?  Well, yes… and no.  Yes because, well, yes; at a minimum that is what you need to spin.  No because, like most activities, having good tools makes the process easier – especially in the beginning.

I recommend a high-whorl spindle to start with.  There’s nothing intrinsically better about high whorls compared to low-whorls, or any other kind of spindle for that matter.  All types have their advantages.  However, the current spindle resurgence, in the US at least, has centered around the high-whorl spindle and this type of spindle is the most readily available, and the most generally used.

For a complete beginner, I suggest a spindle between 1 and 2 ounces.  Something in this range should suit most beginners nicely, and will continue to be useful as a plying tool even if the spinner decides with experience that they prefer lighter spindles.

Whorl diameter is also something to consider.  Generally, the broader the whorl is, the longer the spindle will spin.  For a first spindle, look for something between about 2.5 and 3.5 inches.

With these basics in mind, let me show you the spindles I most often use to teach beginners to spin.  These are only the tools that I have found to be effective – there are many other good spindle makers out there, and this list is by no means exhaustive.

My absolute favorite teaching spindle is this is a 1.3 ounce Kundert:

This spindle has a long, level spin that makes it easy for beginners to control as they first learn to draft.  It also has a nice broad whorl which lends stability to the spin, and the shape of the hook captures yarn well, minimizing slippage.

With many of the advantages of a Kundert spindle, but at a lower price point is this spindle from Spinsanity:

This spindle does not have the hand-turned elegance of the Kundert, but it is well crafted and has a very similar kind of long, easy spin.

Another maker I often recommend to a beginner is Jonathan Bosworth:

His spindles come in several size ranges, but a beginner would probably do well with a midi.  The whorl here is much narrower.  However,  the way it is shaped still keeps the weight distribution towards the rim, which makes for a long, steady spin.  The narrower whorl also makes it easier to carry around with you, so if you plan on spinning  when you’re out and about, this might be a good choice.

Finally, on the high end of the price spectrum is Golding Fiber Tools:

Golding craftsmanship speaks for itself.  If you’re one of those beginners ready to commit whole-heartedly to this spinning thing from day one, a Golding learn-to-spin kit would be an excellent way to start.

There are many other good makers out there and this list is just something to get you started.  If you try one of my suggestions and find that it doesn’t suit you, by all means try something else.  Check out the Spindlers and the Spindle Candy groups on Ravelry for other ideas.  Your spinning will only be improved by experimentation!

Choosing the Right Knitting Pattern for Hand-dyed Yarns

Note from the SpaceCadet:  My friend Abigail of TAAT Designs is a wonderful knitter and real connoisseur of hand-dyed yarns.  And I am delighted that she agreed to share how she chooses the right pattern for each unique yarn…

.

By Abigail

In a recent post on my blog, I was reflecting on my relationship with yarn and I realized that it’s not just about the yarn, but also about the potential contained within it. When I see a skein of yarn, I see more than just the yarn itself. I see the twist of the yarn, the way the colors blend together and how the fiber appears. From here, however, it’s not always straightforward to picture what the yarn will look like when it is knit up, which makes it hard to choose a pattern. Especially with handpainted yarns, there’s always a bit of uncertainty. How long is each bit of color? Do the colors repeat in a systematic manner, or are they completely random? With experience, it becomes easier to predict these things without knitting a swatch, but even a prediction is still no guarantee of what the finished product will look like.

Most handpainted yarns do have a predictable repeat. This means that they will tend toward pooling or striping, depending on the length of each stretch of color. The best way I have found to determine this is to unwind a length of the yarn – two yards is usually enough. If the entire length is all one color, then the yarn will stripe in many usages (socks, children’s sweaters, hats, mittens – anything that is less than about 2 feet in circumference or width). If the length is multiple colors, then you can try to predict whether it will stripe or not by estimating how many stitches you can get out of each color section (a good rule of thumb is that it takes 3x as much yarn as the length of fabric you are knitting across).

Once you know roughly whether the yarn will stripe or not, it becomes easier to choose a pattern. My preference is for yarns that do not stripe, or have minimal striping – I like a new color in every row of my knitting. I’m also a big fan of knitting socks with handpainted yarns, so that’s usually where my mind first goes.

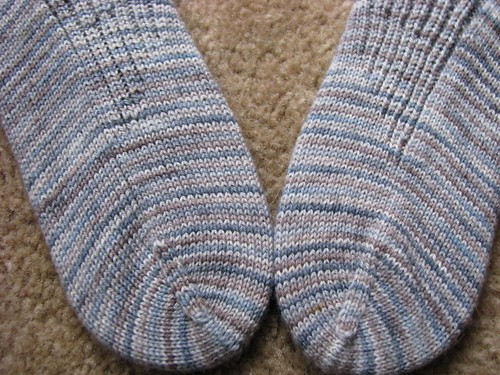
When I received my skein of SpaceCadet Creations’ Cold Waters earlier this year, I wasn’t sure at first what it wanted to be. The colors were so subtle and yet striking all at once, and I wanted to choose a pattern that would really show off the colors. From looking at the yarn, I was able to predict that it would stripe slightly, but not be too overpowering. There was also not much chance of pooling (which I do my best to avoid). This told me that I didn’t need to choose a pattern that would actively reduce pooling, but I didn’t want to choose a pattern that was too busy, either, so that I didn’t overpower the yarn. Because Cold Waters uses tonal shading rather than lots of different colors, however, I knew the pattern could have a little something going on.

IMG_8024
The stockinette portion of the sock clearly shows the beautiful, subtle, not-quite-single-row striping of Cold Waters.

Around the time I received my Cold Waters, I also received a gorgeous pattern from Yarnissima (through a monthly sock yarn club I belong to), The Portland Gussets. I had been looking for the perfect yarn for this pattern, and Cold Waters seemed like it would fit. It had everything I was looking for: medium-length color repeats (too short, and the pattern would be lost in the yarn), not too much color variation (any more, and the yarn would obscure the pattern), but enough visual interest (not enough, and the pattern would be boring).

ColdGussets

I quickly cast on, and the socks just flew off my needles. The pattern and yarn were a great fit!

When you’re knitting hand-dyed yarns, each skein is a unique adventure.  With a little practice, it becomes easy to match a yarn to pattern.  If you take the time to examine the yarn and read its color repeat, the yarn will help you decide which pattern to choose for it.

TAAT Designs is a newly formed design group created by four friends — Trisha, Allison, Abigail and Tesia —  to combine their love of knitting with their desire to create unique and fun patterns for knitted objects of all types.  Read more about their adventures on the TAAT Designs blog.