Six (Good!) Reasons to Swatch Besides Getting Gauge

Six (Good!) Reasons to Swatch Besides Getting Gauge

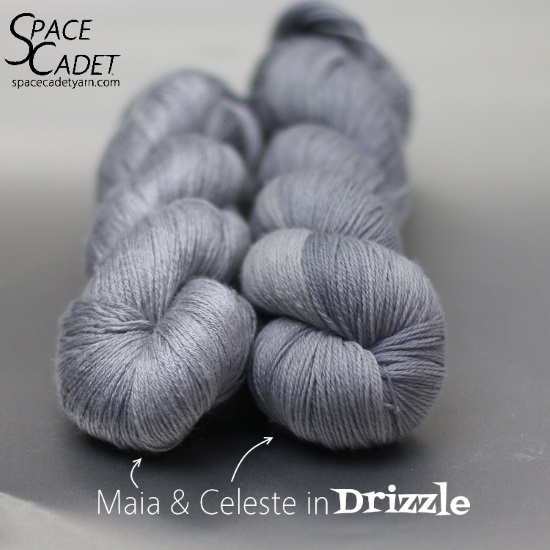
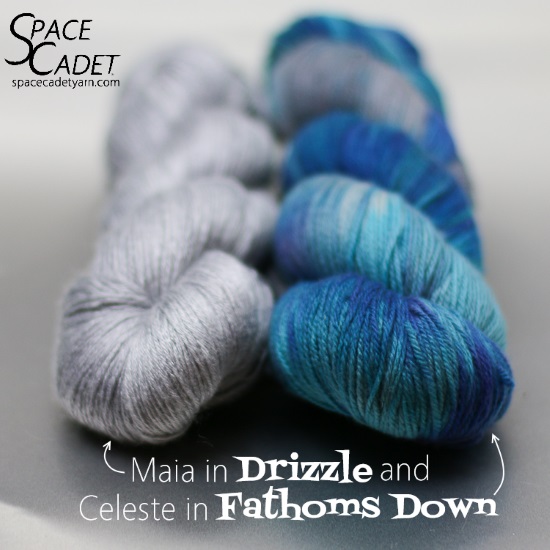
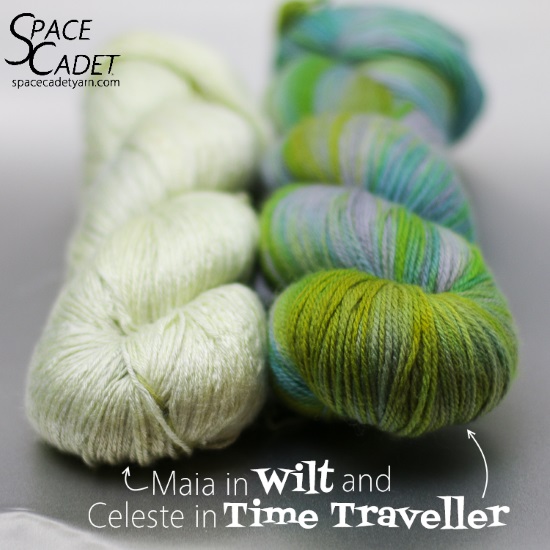
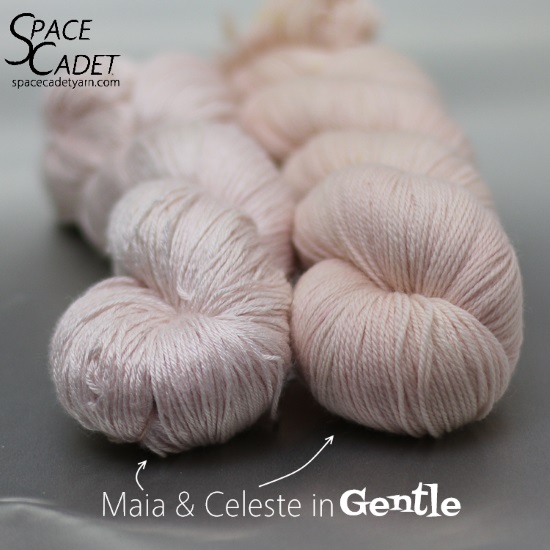
We’ve spent the whole week sending out parcels filled with gorgeous combinations of Maia and Celeste and, as I see the fabulously creative pairings folks have come up with, I am realising that this is going to be a super fun KAL!  And, with the yarn arriving on customer’s doorsteps, it’s time to start thinking about swatching.

*sound of a record scratching*

Why yes, I did just used the words “super fun” and “swatching” in the same breath!  I know we all think swatching is about getting gauge (and it is) and may be a little boring and frustrating (and it is) but it’s also about so much more than that.  And for this KAL, where we’re combining two very different yarns together in one project, swatching is a really important step toward to getting to know how your two yarns play together and how to bring out the best in them.

But if you’re not sold on the idea of swatching, that’s ok — you’re not alone.  Lots of folks feel the same way.  So before you run away and pretend I never even mentioned the s-word, let me take a moment to share with you…

Six (Good!) Reasons to Swatch Besides Getting Gauge

To Check for Colourfastness

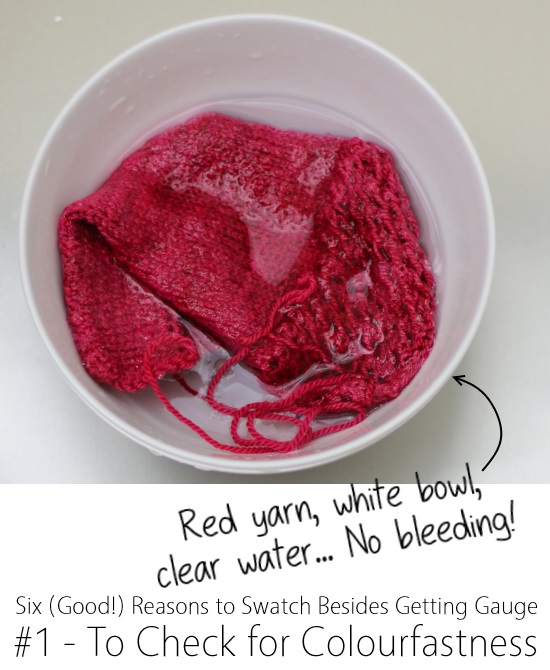
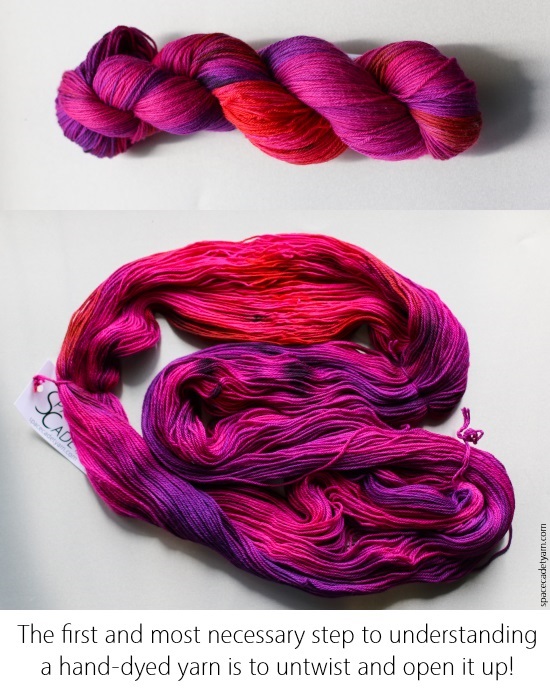
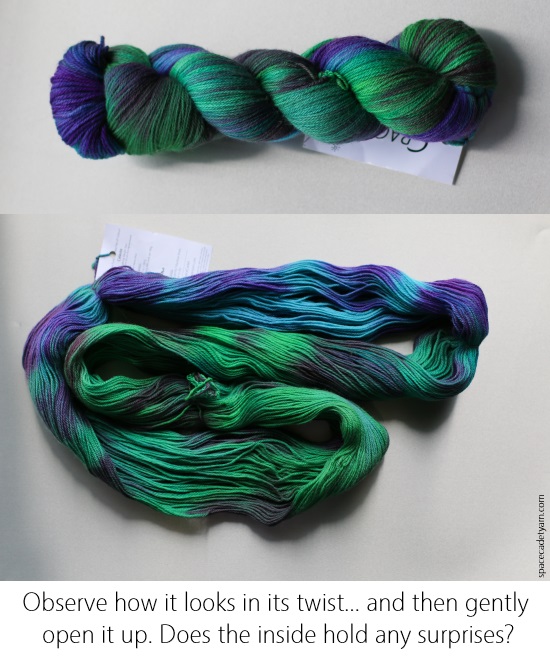
I sometimes come across a misconception about hand-dyed yarn: that it’s not as colourfast as commercial.  And so I’m always happy to explain all the steps we take to make sure your SpaceCadet yarn won’t bleed or crock.  Almost all professional, experienced hand-dyers employ professional-grade dyes and multi-step processes to ensure their yarns are fully set and colourfast, so you can feel confident of that when you buy from them.

But some newer dyers may not know to take so many steps, and full-time dyers can make mistakes, so it is always worth checking your yarn is colourfast before casting on your project, particularly if you’re using multi-hued or high-contrast yarns.  Soaking a whole skein to see if it bleeds is pretty impractical, but a swatch is perfect for this.  Cast on a few inches, knit or crochet a quick square, and then give it a bath.  If the dye hasn’t set properly, you’ll know pretty quickly, and it’s a lot better to find out after knitting a quick swatch than after working for hours on a full project

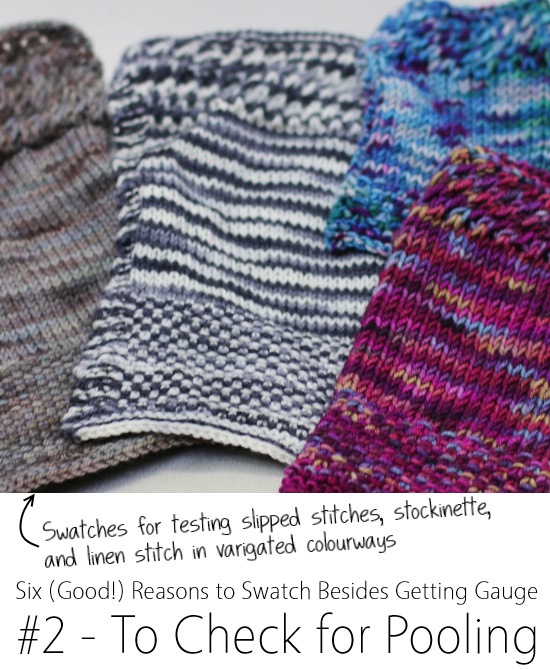
To Check for Pooling

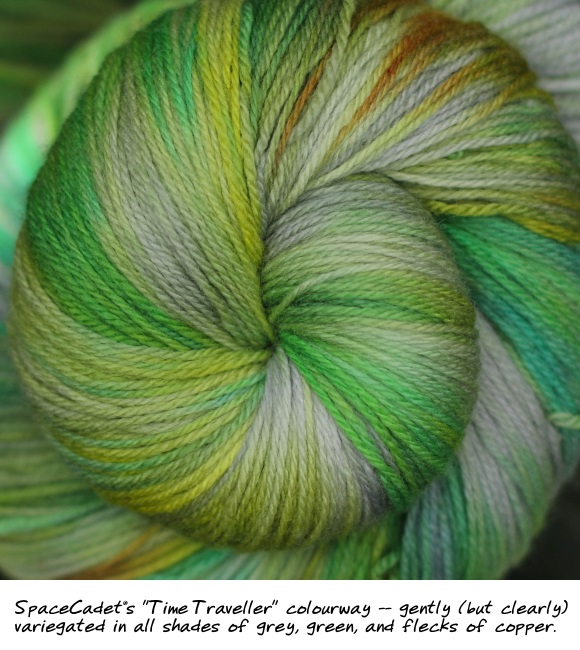
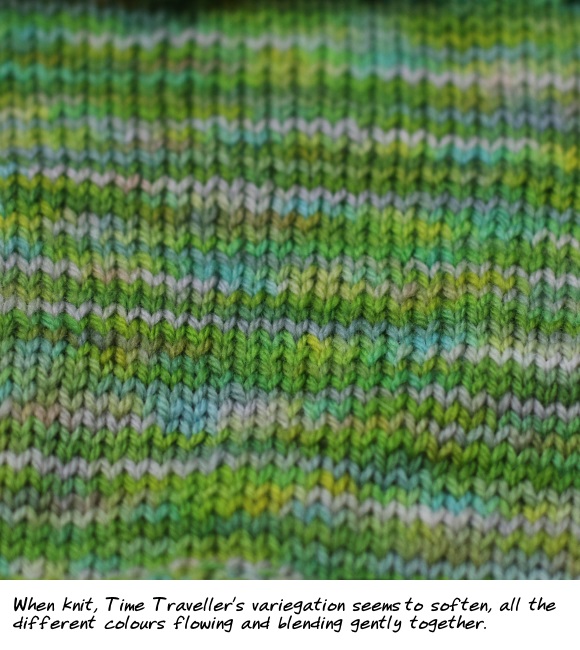
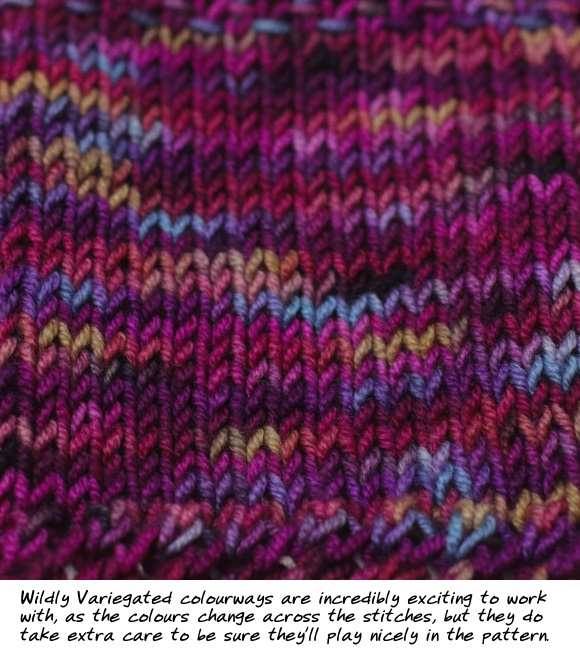
Pooling happens when the different colours in a variegated yarn start to stack on top of each other with each row you knit.  The resulting pools of colour are something that some folks love but lots of other folks want to avoid.  Because pooling depends on the size of your stitches (needles) and the width of your project, swatching won’t give a definitive answer to how the colour in your yarn will behave in your final project, but it will give you a much clearer idea.

You can tally how long the colour repeats will work up at your gauge, and then quickly see what effect adjusting needle sizes makes.  You can anticipate whether your yarn will create long bands of colour or short bursts, and then try out different stitches to move the colour around: switch from stockinette to garter to slipped stitches and so on to see how the colour works in each one.  Creating a small swatch is a quick and easy way to get a feel for how the yarn is likely to behave before you cast on a bazillion stitches.

To Try Out a Pattern’s Techniques

Many patterns recommend swatching in stockinette — and that can work just great — but when a pattern recommends swatching in the particular stitch that the design is worked in, you have the chance to get familiar with the techniques you’ll be using… before you’ve got 250 live stitches!

Once you’ve knit enough swatch to check your gauge, take that opportunity to go a little bit further and try out any tricky steps that you see in the pattern.  Is there an increase or decrease you’ve never tried before?  Feeling a little nervous about joining in a second colour?  Try it out in your swatch — you’ll work out the kinks quickly and be a lot more confident when you cast on the full project.

To Test the Weight of the Fabric on Different Needle/Hook Sizes

So many times I get asked, “What size needles is this yarn for?” and I’m always excited to talk about all the fabulous results you can achieve when you get creative with needle and hook sizes.   There are no set rules and no yarn is for just one size of needle or hook.  One of my favourite things to do is to take fingering yarn (which most ballbands will tell you is “for” size 1 or 2 needles) and knit it on size 8s.  The resulting fabric is light and airy, perfect for summer shawls and cardigans.

And your swatch is the perfect place to test that out!  Cast on with the needle or hook size you think you’re supposed to use, and then take it up a few sizes.  Do that several times and see what happens to the fabric.  Does it become a thing of beauty or does it lose its structure?  Can you imagine it in a completely different garment than you’d first planned?  Suddenly your gauge swatch goes from something a tool for fitting into someone else’s recipe to one that opens you up to new possibilities!

To Get to Know that Yarn You’re Going to Spend Hours (and Hours!) With

Knitting or crocheting a whole sweater takes a lot of time…  and, if you’re going to put that many hours into a project, you want to make sure that you and your yarn get along really well.  Swatching is your chance for the yarn to “talk” to you and let you know what it’s really best suited to.  Before you make a decision about the project it will become or the techniques you will use with it, you’ll want to spend a little time getting to know it — and that’s what swatching does.

You might find it argues with your wooden needles but glides on your steel needles.  You may discover it blooms into an almost completely different yarn once you soak it.  Or blocking may transform your swatch so much that you decide on whole new project.  Swatching is like a sneak peek into the future!  Such a valuable thing to do.

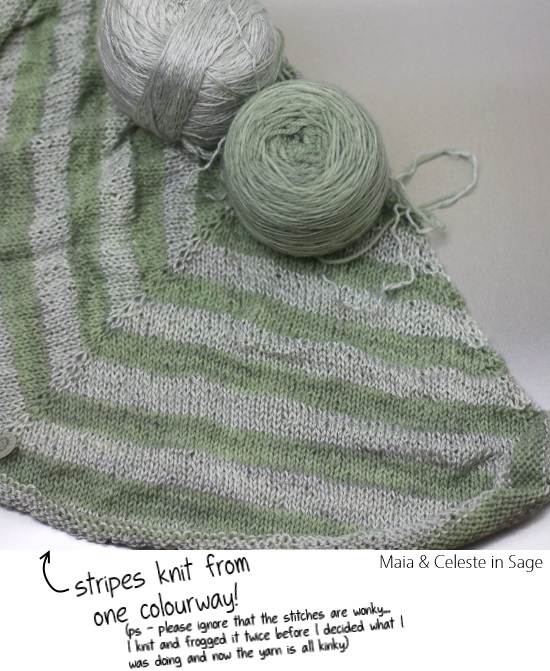
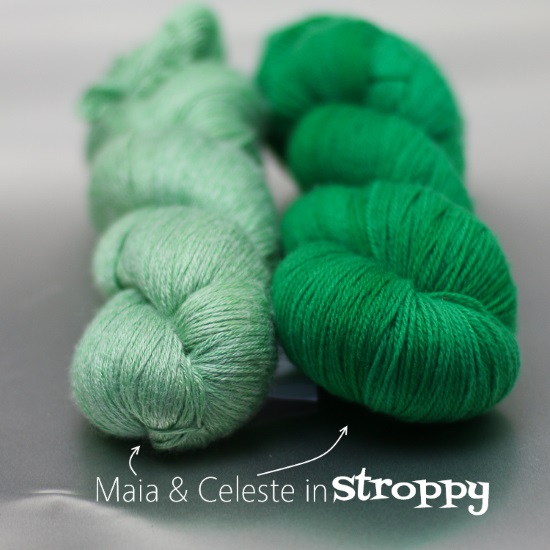
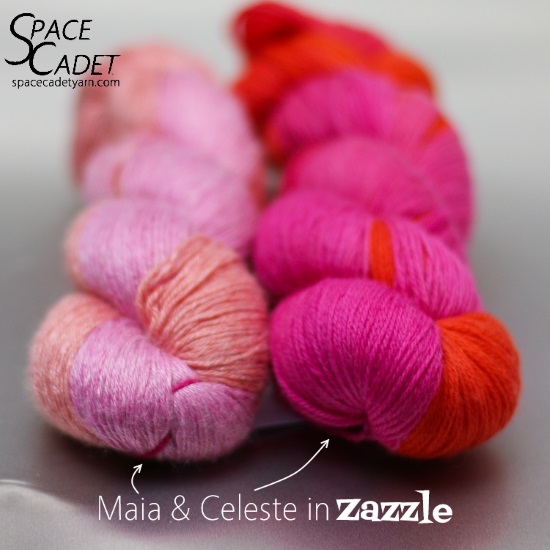
To Try Combining Yarns

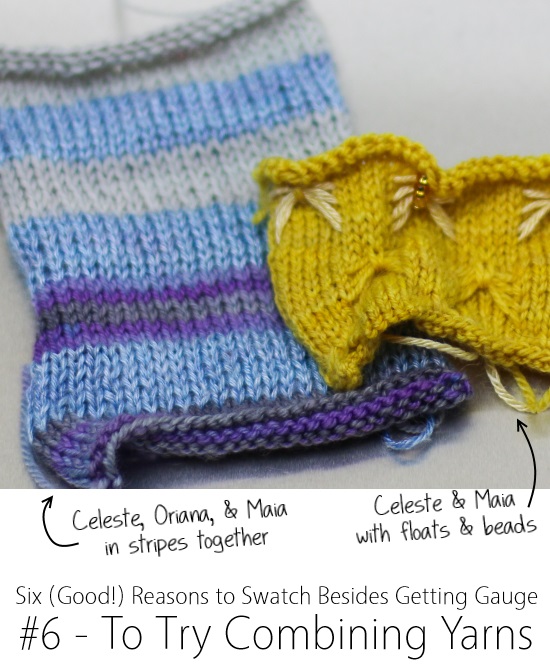
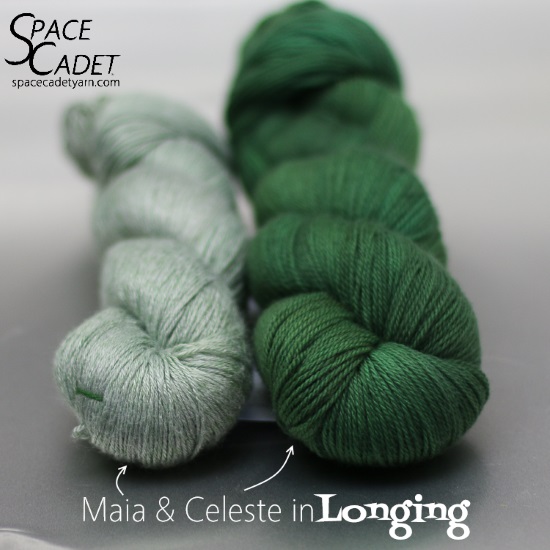
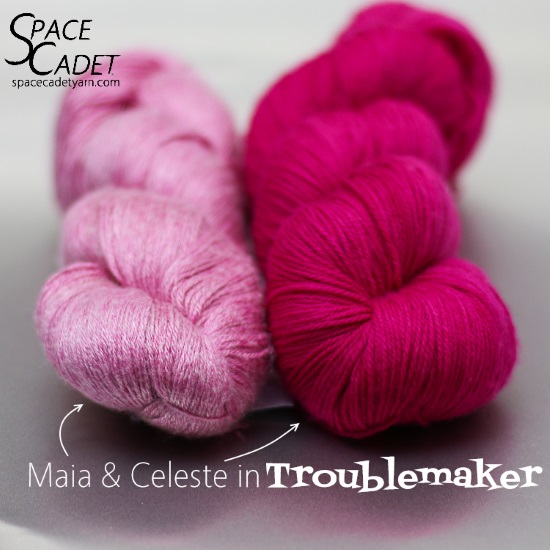
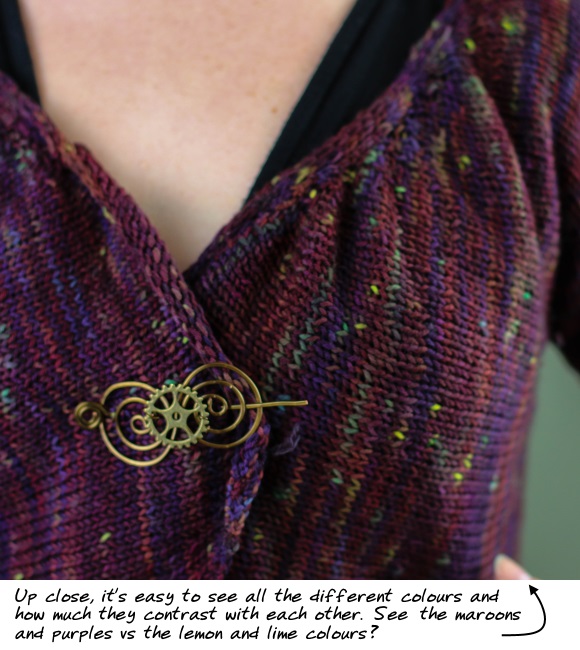
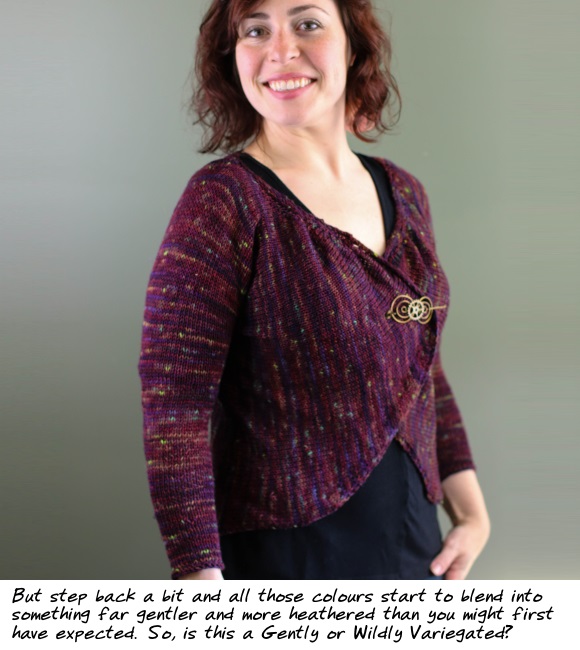
So often at shows, when I show a customer Maia and Celeste side-by-side and tell her that they play beautifully together, I see the slightest twinge of doubt go across her face.  And I get it — they’re such completely different yarns, how could they work together?  It’s all well and good for me to say it, but nothing beats testing it out.

And so what do you do?  You swatch!  You try combining them in stripes — first thin and then thick.  You test them in mosaic stitch and slipped stitches.  You compare stockinette vs garter, linen stitch vs moss, single crochet vs treble.  When there’s only a few inches to knit, you have time to really explore how two yarns work together.  And then you can choose a pattern that will really enable them bring out the best in each other.  The swatch is what ensures your final project will be all that you hoped for!

The Beauty of Combining Yarns

The Beauty of Combining Yarns

“You’re so creative!”  How many times have you heard that when someone sees what you’ve knit or crocheted?  The thing is, it’s really true.  Whether you’ve just followed a pattern to the letter, or you’ve modified it a little, or you’ve designed something yourself from scratch, the fiber arts is that they push us all a little out of our comfort zones.  We all feel the urge to try a new technique, put together a bold colour combo, or work with an exotic new fiber, and we grow in our creativity when we do.

When we go to shows and I get the chance to help our customers choose yarns, there’s one creative challenge I’m always encouraging them to try: combining different yarns together in one project.  I don’t just mean different colours but different yarn bases — as long as the yarn weights work together, combining different bases can create stunning effects.  The members of our Mini-Skein Club know this: the yarns are always fingering weight but the parcels contain different bases, and we’ve designed them to work together.

Combining Yarns Made Easy

Now, I get it — most patterns use just one type of yarn and so we’re all trained to stick to one base for each project.  Branching out and combining two different yarn types can be a little intimidating so let me help you out with a combination that works beautifully and creates a stunning result: Maia and Celeste.

First, let’s start with Celeste.  It’s a light fingering — a full 490 yards of scrumptious merino per skein — that absolutely loves to be knit on larger needles (think US size 8s) to create a wonderfully light and floaty fabric.   And then there’s Maia: it’s nearly the same weight, just a little bit heavier at 400 yards per skein but, with 80% bamboo, it has a drape and lightness that are a beautiful match for Celeste, and you can easily use the two in the same project.

But here’s where the magic comes in: visually, they’re very differentCeleste‘s 100% superwash merino takes on dye with a gorgeous intensity — the colours are rich, vibrant, and delicious — and, most importantly, with a matte effect.  Whereas Maia takes on those same colours incredibly lightly — much paler, softer, beautifully delicate — and it’s bamboo content give it sheen that makes the yarn look almost iced.  Two yarns that play nicely with each other but give you vibrant colour vs soft…  matte vs sheen…  You can create distinct stripes even though you’re working with yarns in the exact same colourway!  Are you beginning to see why I love this combination?

(See all these images here with two yarns in the same colourway?  That’s an illustration of just how distinctly different fiber contents take on the dye.  Believe it or not, all of these yarns might actually have been dyed side-by-side in the same dyebath.  They really do take on colour that differently!)


But don’t forget your stash!  If you’ve in the Mini-Skein Club, I know you’ve got some awesome Maia-Celeste combos you can put together and let the two gradients work together.  Or pick one yarn from your Minis and pair it with the other yarn in a semi-solid for contrast.  There are all sorts of combinations you can create!

My Recommendations

To make this a great combination, here are my best suggestions:

  1. Celeste and Maia are both fingering, so go for a pattern that’s designed for fingering yarn.
  2. Any pattern will work if you’re comfortable changing yarns on your own but it’s probably best (and easiest) to choose a pattern with stripes.  Then, instead of changing colour for the stripes, you change the yarn.  Cool, huh?
  3. Both of these yarns have wonderful drape, Maia’s high bamboo content makes it perfect for shawls and summer sweaters.  But I’d suggest steering clear of things that need a lot of elasticity, such as socks.
  4. I’m crazy about the way Maia and Celeste look together in the same semi-solid colourway (as you can tell from these pictures) but don’t shy away from mixing a semi-solid with a variegated or creating a contrast.  It can look amazing!

Looking for some pattern ideas?  Here are two patterns that jumped right out at me…

Ardente by Heather Zoppetti

Worked in four triangles that are joined seamlessly, this eye-catching wrap contains stockinette, garter stitch and lace bands that zig and zag over the place.  Creating this in Maia & Celeste will add texture and sheen to the mix, for a truly stunning effect!

Sea Grass by Janina Kallio

Sea Grass features bias construction, three-dimensional lace, and garter stitch stripes that create interesting texture and a wonderful chance to play with colour.  Working the pattern in the matte and sheen of Celeste and Maia will create an additional level of intrigue for a truly stunning project.


How to Use Instagram for Knitting Inspiration!

How to Use Instagram for Knitting Inspiration!

Keeping up with all the changes in technology and social media can be tough — it seems like some new app comes out every week! — but when that new thing serves up fantastic knitting and crochet inspiration, it’s totally worth it.  Instagram is a perfect example and, if you haven’t been using it help you find pattern and yarn ideas, to connect with other crafters, or just to give you a daily dose of fibery goodness, you’ve been missing out!  So here, let me walk you through the best ways to use Instagram as a knitter or crocheter…

Instagram (or IG) started as a simple photo sharing site: a place to snap a photo with your phone and share it with your friends.  Over the past few years, it’s really taken off and developed into something much more exciting.  For me, it beats a lot of other social media hands down, including Facebook and Twitter.  It’s fast to browse but not so fast that you feel like you’re missing everything. And it’s designed to be visual (perfect for sharing projects), beautiful (who doesn’t want to spend time on a site that’s truly beautiful?), and easy.

Ok, so how do you get the best out of Instagram as a knitter or crocheter?  Here are my top tips:

Get the Mobile App

If you haven’t got an IG account already, download the app onto your phone and get your account set up.  It’s super straightforward and totally worth doing.  But unlike other social media, Instagram is not intended to be used on your desktop or laptop computer and it’s really limited if you try.  So look at it on your phone or tablet instead — you’ll have a much better experience.  (Click here for the iOS app and click here for the Android app)

Then once you’re set up, snap a picture of your latest project and upload it.  Instagram has a bunch of filters to make the image really come alive and, over time, you can put together a wonderful visual history of your knitting or crochet journey.

Follow Your Favourite Designers

The easiest way to fill your Instagram feed up with crafty inspiration is to follow your favourite designers.  Besides getting a first look at lots of new designs and a sneak peek behind the scenes, many designers use their visual and artistic skills to put together amazingly beautiful images and feeds.  One of my favourites is Hunter Hammersen, whose IG posts are so lusciously photographed that I feel I’m almost falling right into them.

Design: Permutation by Hunter Hammersen in SpaceCadet Capella

To find your favourite designers on IG, just hit the little magnifying glass tool at the bottom of the app, and then type the designer’s name in the search bar.  Or, the next time you’re browsing on Ravelry, go to a designer’s profile page to find the link to their Instagram account and add them that way.

Use Hashtags to Find Great Inspiration

One thing always leads to another and, on Instagram, that’s a really good thing.  As you’re scrolling your IG feed, you’ll see lots of posts with a ton of hashtags after them (words and phrases that begin with the # symbol, such as #knittersofinstagram).  Click on any of those and Instagram will take you to a new feed filled with other posts that were tagged with the same hashtag — which means lots more inspiration from lots of new sources!

And when you are creating your own Instagram posts, use hashtags to help other knitters and crocheters find your photos in the same way.  Some good hashtags to try are:

Get some SpaceCadet Mini-Skeins for yourself!

Leave a Little Love or a Comment

One of the best things about Instagram is interacting with others.  We all used to leave comments on blogs but that doesn’t happen so much any more, and internet forums are great if you have time to really get into a conversation, but Instagram comments are way easier and and so much faster.  It’s totally where the conversation is happening now!  Plus, every time someone likes or comments on one of my posts, a little notification pops up on my phone (and it seriously warms my heart — it really does).  And leaving a little love couldn’t be easier: just click the heart under the photo — it’s that fast.  To leave a comment, you click the speech bubble right next to the heart.  (And to share the post with a friend on Instagram, just click the little paper airplane to the right of the speech bubble.  Nifty, huh?)

Get some SpaceCadet Mini-Skeins for yourself!

Save the Images You Like Most into Collections

If you see a photo of a design or a project that really inspires you, save it so you can find it later by tapping on the ribbon-like icon to the right under the image.  That puts it in your saved photos folder, which you can find by going to your own profile page (tap your avatar image in the very bottom right corner of the app and it will take you there) and then click the corresponding ribbon icon on that page.  You’ll see all your saved photos right there waiting for you.

See SpaceCadet’s Linking Sweater Kits

Even better, you can organise your saved photos into collections, creating a customised feed of inspiring photos to scroll through anytime.  Next time you see an Instagram post you want to add to a collection, tap and hold the ribbon icon and a little box will pop up asking you to choose a collection to add it to.  Create one for knitting patterns you love, another for crochet patterns, one for new techniques to try and, hey, maybe one for all the SpaceCadet yarn you’re drooling over!  There are all kinds of possibilities!

Tag your Friends — or Even your Favourite Designers!

One of the most fun things about Instagram is being able to share your posts and thoughts with the other Instagrammers.  When you type the caption for a post, tag fellow IG users by putting @ in front of their Instagram name.  That makes a notification pop up on their app so they know to come look at your lovely project.

Design: Darlina by Corrina Ferguson in SpaceCadet Lyra

Even better, you can tag the designer of your project in the same way and make a direct connection.  Lots of designers love to see their work “in the wild” on Instagram — and some will even re-post projects to share with all their followers — so tagging is a great way to show off how their pattern is coming out on your needles.  And connecting with the designer makes the whole project that much more fun!

If you’re using SpaceCadet yarn, please tag me too @spacecadetyarn — I just love to how our yarns look in all the different projects folks post on Instagram!  Your IG post will pop in my feed so I can check out your progress and send a little love your way too.

And Finally, Follow Me!

Lots of designers on Instagram have really beautiful feeds, filled with wonderful, stylised shots that just make me drool.  I’ll admit, the SpaceCadet feed isn’t that beautifully manicured: there’s lots of pretty yarn but also lots of behind-the-scenes shots that a little less than perfect (I tell myself that just means I’m keeping it real).  But if it’s inspiration you’re looking for, I think that’s a pretty good combination: the messy and the beautiful together — because that’s how it really is, right?

To follow @spacecadetyarn, just click here and then tap the word “Follow” right above any photo in my stream.

Now It’s Your Turn!

Are you ready to start using Instagram for knitting and crochet inspiration?  It’s such a fun and awesome (and beautiful) way to  get your creative juices flowing, so use these tips to get the most out of it.  And be sure to comment on one of my posts and say hellow — I can’t wait to see you on Instagram!


The Most Important Step You Need to Take to Understand your Hand-Dyed Yarn

The Most Important Step You Need to Take to Understand your Hand-Dyed Yarn

Whenever we go to a trunk show or a yarn festival, I get asked one set of questions in particular: how will this yarn behave? will it pool? what will it look like?  And I’m always glad to delve into that, because finding the answer is so much fun!

There are several clues in your skein that will give you a good idea how it will behave, but there is one necessary, first step that I find many of our customers are reluctant to take.  They turn a skein over and over in their hands and try to decide what it will look like as they knit or crochet it up.  But the real way to understand a skein is to untwist it and open it right up!

Untwist your skeins 1

Did you pause for a moment when you read that?  Don’t worry — most people do.  I know how our yarns look in our lovely displays — piles of colourful skeins arranged just so — and you don’t want to mess them up.  But the truth is that, while you can usually look at a commercial yarn all twisted up and get an idea of how it will behave, a hand-dyed yarn is completely different and you really have to get in there and look at it closely.  When yarn mills or really large dye houses create yarns, they usually blend the colours before they spin them, so any irregularities in colour get evened out, and so what you see on the outside of a skein is very similar to what’s happening on the inside, meaning that you can understand the yarn without untwisting it.

But with hand-dyed yarn, the colour is added after the skein is spun, and so the colour can be very irregular — whether by design, as part of the dyer’s technique, or simply because of how the colour distributes itself in the dyebath.  Once that dye adheres to the yarn, there’s little can be done to change or even it out.  Depending on how the yarn is dyed, the colour may or may not stay the same across the whole skein — meaning what you see when you hold it twisted up might be very different from what it actually looks like when you open it out.

And so the first step to understanding how a colourway will behave when start to work with it is to untwist it and open it right up.  Now I can’t speak for all dyers or yarn companies, but I can say that we never mind if you untwist out skeins.  In fact, we use tags instead of ball bands specifically so you can do that, because I truly believe you can’t fully understand a colourway — particularly a variegated or one-of-a-kind — until you look at the whole thing.

Untwist your skeins 2

(If you then twist it up again before you put it back, we’re always grateful but, if you don’t know how, just hand it to one of use and we’ll be glad to put it back together for you.  Or to teach you, if you like!  It’s dead easy and we do it all the time.)

When you do untwist your skein, there are certain things to look for that will give you clues as to how it will behave when it’s worked up, and we’ll go over those in upcoming blog posts.  But for now, go grab some hand-dyed skeins out of your stash — particularly if there are some variegateds that you have never untwisted — and have a good look at them.  Observe how they look in their twist… and then gently open them and see what you find.  Does the inside hold any surprises?  Is it different from the outside? Or have shades you didn’t expect?  Twist it back up again — perhaps starting from a different point and see how that affects the colourway.  I’d love to hear what you find — and whether any of your skeins surprise you!


Understanding Colour: Variegateds, from Gentle to Wild

Understanding Colour: Variegateds, from Gentle to Wild

Last week we talked about the different meanings of the colour terms “solid”, “semi-solid”, and “tonal” — all of which refer to yarn dyed in a single hue.  But so often the yarns that really send our pulses racing are the multi-hued colourways — layer upon layer of fabulous colour, almost glowing in our hands as we turn them over and over to catch every last shade.  These are variegated colourways and, beautiful as they are, they can be intimidating.  But there are different types of variegateds and, once you realise the differences, they become much more approachable.

Understanding Colour -- Variegateds from Gentle to Wild

So first, let’s define what we’re talking about.  The straight-up definition of a variegated colourway is any colourway that contains more than one hue (colour). So, going back to last week’s post, if a yarn contains light kelly green and mid-kelly green and dark kelly green, it’s not variegated, it’s tonal because the hue of all the greens is the same.  But if a yarn contains a yellow-green and a blue-green as well as the kelly green, now it’s got mutiple hues (colours) and that makes it variegated.  To put it very simply: in a variegated colourway, the colour varies.

But there’s far more to “variegated” than just that simple definition.  Here at SpaceCadet, we tend to divide our variegateds into two categories: Gently Variegated and Wildly Variegated, and the good news is that they are exactly what they sound like.

Gently Variegateds: The Easy-to-Love Variegateds

Gently Variegated colourways are low contrast — their colours blend and flow into one another.  Think of our colourway Time Traveller, all shades of green and gray and gentle flecks of copper.  There are actually a whole bunch of colours in there — it’s definitely variegated — but none of them are jarring against each other.  In fact, although the yarn looks clearly variegated in the skein, when you knit it up, it’s quite startling just how much the different colours begin to flow into each other.  In fact, if you back up a few feet, it all begins to blend together as if it were hardly variegated at all.

SpaceCadet's Time Traveller

SpaceCadet's Time Traveller Knitted

Wildly Variegateds: The Bad Boy Colourways You Can’t Help Falling For

Wildly Variegated colourways are high contrast, containing hues that pop and sizzle against one another.  These are colours that jump around on the colour wheel, like the rust-and-blue combination in Windswept or the maroon-blue-yellow of Molten Cool. They’re incredibly exciting to knit or crochet with, the colours morphing and changing across your stitches.  But because they are high contrast, they can be high maintenance as well — there’s a push-pull element to the colours that means that, unlike Gently Variegateds, they may not play nicely together in plainer stitches.

SpaceCadet's Molten Cool

SpaceCadet's Molten Cool Knitted

So, so far, so simple.  Variegateds are colourways that contain more than one hue (colour).  Gently Variegateds are low contrast and Wildly Variegateds are high contrast.  Easy, right?  Yep, so let me complicated it just a bit.

When Gentles Go Wild (And Vice Versa)

There’s another element to what makes us perceive a variegated yarn as either Gentle or Wild, and this one defies the neat definitions we discussed above.  That element is the specific layouts of the colour repeats.  Or put more simply: how quickly and often the colour changes.

A yarn with long colour repeats will tend to look more variegated regardless of whether the hues are high or low contrast, simply because those long stretches allow the colours to separate in your knitting or crochet.  Depending on your project, they may stripe (or semi-stripe), pool, argyle, or create irregular flashes.  And when there are these sorts of large, distinct areas of a single hue which abut other distinct areas in a different hue, our eyes more easily perceive those colour changes and the colourway appears to have higher contrast (even when the two hues are similar).

And the reverse is true as well: when a yarn has many short colour repeats, it tends to look less variegated, regardless of whether its hues are high or low contrast.  Short, quick colour repeats create tiny pops of colour that sit right next each other in your knitting without such distinct edges.  Because of this, our eyes perceive even a wildly variegated colourway almost as a single, multi-hued colour (as if such a thing were possible) and the whole thing appears to be lower contrast.  Think of a heathered yarn, which may have anything from grays and browns to blues, greens, yellows, and perhaps even hot pinks — and yet, because the colour changes are many and often, they all blend together in a way that could almost be described as soft.

A Wildly Variegated colourway looks gentle thanks to short colour repeats

A Wildly Variegated colourway looks gentle thanks to short colour repeats (2)

Here’s a great example:  this is Mythos by Laura Nelkin, which my assistant Jade knit in a one-of-a-kind colourway we created last year.  If you look closely, you can see that the colours are actually very high contrast — there are maroons, purple-blues, dusty aqua, lime green, and even yellow.  By definition, it’s a Wildly Variegated colourway (and kind of sounds like it should be approaching the dreaded clown barf).  But, in reality, the short repeats give only pops of colour instead of stripes or pooling.  And the result is a colourway that is Gently Variegated and almost heathered — proof that even high contrast colourways don’t have to be so wild after all.

Now It’s Your Turn…

So now that we’ve gone over the terms, here are two exercises to give you hands-on practice in understand these different types of variegateds:

  • First, go to the SpaceCadet colourways page and scroll to the bottom to see our variegated colourways.  Mentally note which look Gentle and which look Wild to you, and then compare it what we consider Gentle or Wild by clicking on the buttons at the top (you’ll see them marked “Gently Variegated” or just “Variegated” — I left off the word Wild because I didn’t want to them to sound scary).  Remember that although there are clear definitions for both, there are no right or wrong answers — the perception of wild vs gentle is pretty subjective.  Even very high contrast colours can look Gentle if they are configured the right way; and low contrast colours can start to look a little Wild if they are allowed to pool, flash, or stripe.
  • And then, go and look at your own stash and see what you gravitate to.  Do you have a lot of yarns with colours that blend and flow into one another, or that are close on the colour wheel?  Or is your stash filled with yarns whose colours that contrast sharply with one another?  Open the skeins up to see how long the colour repeats are, and think about how is that going to affect the way the yarn looks when it’s knitted or crocheted.  Most importantly, how do you feel about the colourways in your stash?  Are you excited to work with them and see how they come out or are you a little intimidated by them?  Ultimately, whether Wild or Gentle, low contrast or high, the how we feel about the end result is what really matters.  But we’ll get better results from our yarn — and our yarn shopping — if we really understand what draws us to the yarns we love.

Next up in this series: a colourway that seemingly defies all these definitions… and what makes it so interesting.  I’ll be posting that sometime in the next week or so — don’t miss it!

Understanding Colour: Solids vs Semi Solids vs Tonals

Understanding Colour: Solids vs Semi Solids vs Tonals

An addiction to knitting and crocheting (raise your hand!) might seem like it’s all about the fiber, but it’s really as much about colour. And while lots of folks immediately get schooled up in yarn terms — fingering vs DK, wool vs acrylic, merino vs BFL — there’s a lot of confusion around colour. The terms can be muddling and matching up colourways to patterns can be downright perplexing. I can’t tell you the number of conversations I’ve had with customers at shows where we’re all using the same words (“semi-solid”, “variegated”, “tonal”…) but all at cross-purposes. And so today I start a series of posts to lift that confusion and explain colour terms for hand-dyed yarn.

Understanding Colour -- Solids vs Semi Solids vs Tonals


Ready to get started? First up, three words that sometimes get used interchangeably and sometimes to refer to completely different things: solids vs semi solids vs tonals. Here’s how we use them at SpaceCadet…


Solid Colours (and When a Solid is Not a Solid)


Solid colours are what commercial yarn companies create when they dye in a single hue. You look at a solid skein and you see one, even colour, without variation along the entire length of the yarn. And here’s the key about understanding a solid colour: in natural materials, it can only be achieved by dyeing the fibers before they are spun into yarn, which means it’s usually only larger commercial yarn companies that can create a true solid yarn.


Why? Because it’s the nature of dyeing that the colour is distributed unevenly in the dyebath — to varying degrees, of course. In some dyebaths it’s very obvious that the colour is uneven and in others barely perceptible, but it’s almost impossible to get dye 100%, totally and completely evenly distributed in the water — and therefore on the item being dyed. That means that there will be places where the dye adheres to the fibers more densely (eg, more intensely) than in others, and the result will look uneven.


Commercial solid yarns
But the big yarn companies are able to solve this problem by dyeing unspun fiber and then running it through huge blending machines and industrial carders before spinning it into the yarn. The process ensures that any uneven patches are redistributed and the resulting yarn is a beautifully even, solid colour. If you were to pick a commercial yarn apart and compare each individual fiber to another, you might be able to spot some variation, but the overall effect is a yarn in a solid colour.


Semi-Solid Colours (the Solids of the Indie Dyer’s World)
Semi-solid colours are, again, a single hue but this time showing off the natural variation that results from the unevenness of the dyebath. Semi-solids are what you get from hand-dyers — even when dyeing with a single hue, it’s almost impossible for an indie dyeing company to achieve a truly solid colour. Why? Because most indie dyers work with skeins that have been spun by a mill, which means they’re dyeing fiber that is already in yarn form and so, if the dye adheres to the yarn unevenly, there is no way to redistribute the colour to make it even.


And that’s the nature and the allure of hand-dyed yarn. Instead of looking for perfectly even colour, hand-dyed has intriguing depth and beautifully organic variation that makes each yarn truly one-of a kind. In a finished garment, semi-solids will look like a single colour from a distance, but reveal fascinating complexity up close.


Three Semi-Solids -- Tickled, Gobsmack, and Drizzle


Now, do I always faithfully refer to our yarns as “semi-solid”? No, I call them “solid” as often as not because, in regular conversation, it doesn’t make much difference. But if we’re being technical, as we are here, then all our single-colour skeins are semi-solids.


Tonals (and Here’s Where It Gets Tricky)


“Is this a tonal or a semi-solid?” is a question I get asked a lot. It’s often followed by, “Wait… what is a tonal exactly?” I’m not surprised, because the answer is a little technical, but let’s try to keep it simple here.


Headstrong -- a great tonal colourway


A colour tone is created by mixing a pure colour (a hue) with a grayscale colour in the range between black and white. So, if you have a pure green, and you mix it with black or an almost-black gray, you’ll get a darker version of that same green, which is called a “shade”. And if you take the pure green again and mix it with white or an almost-white gray, you’ll get a lighter version of that green, called a “tint”. In both cases, it’s still the same hue — the green isn’t any yellower or bluer — it’s just a darker or lighter. Together, the shades and tints (the darker and lighter versions) are the “tones”. Got it?


Tones -- pure hues, tints, and shades
So a tonal yarn is simply one that incorporates lighter and darker versions of the same colour in the one colourway. It doesn’t have any other hues — no yellower greens or bluer greens — just darker and lighter sections of the exact same colour.


Is that the same as a semi-solid? Well, in some ways, yes. At SpaceCadet, the yarn we dye starts out white(ish) so in those places where the dye doesn’t strike as intensely, what you’re getting is the colour mixed with the white of the yarn — which is a tint. But unless the undyed yarn also has naturally dark gray sections (and ours doesn’t), a typical semi-solid won’t contain any dark tones (shades). So the terms semi-solid and tonal are almost the same thing. Not quite but so close that, in day to day conversation, it probably doesn’t really matter — I tend to use them both without worrying.


Twisted and Tickled -- a good example of tone on tone


There you have it, three words that are often used interchangeably but actually have slightly different meanings. In day-to-day chit chat, the differences probably don’t matter much but, if you want to be as accurate and knowledgeable about the colour of your yarn as you are about its fiber content or construction, then it’s important to understand these details.


Now It’s Your Turn…
So now go and look at your stash — what have you actually got? Do you gravitate toward true solids or do you like the variation and intrigue of semi-solids? Can you find any true tonals, with both lighter and darker tones? Do you love the one-of-a-kind nature of hand-dyed semi-solids?


Up next in this series: understanding variegateds, from gentle to wild. I’ll be posting that sometime in the next week or so — don’t miss it!