The Key Step to Making the Most of your Hand-Dyed Yarn

The Key Step to Making the Most of your Hand-Dyed Yarn

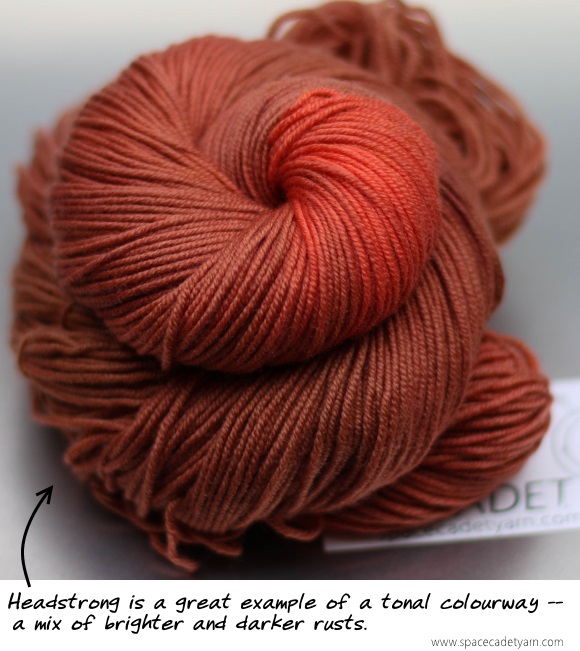
A couple of weeks ago, I shared with you the Knitting Rule of Thirds, a quick technique that’s great for visualising how a yarn’s colours will work up in your knitting.  Understanding how to do it turns you into a little bit of a skein-reading ninja.  You can open up any yarn, quickly scan the colourway, and immediately get a solid idea of how the colour repeats are going to behave.  Go you!

So, now you’ve bought that skein and brought it home, and it’s time to find a pattern and cast on.  Whoa, there!  Not so fast!  If you love this yarn — if you really, really love it and you want your project to look a-maz-ing — there’s one more step that you’ll want to take to make sure you’re doing this beautiful colourway right…

Swatching — But Not for the Usual Reason!

Yeahhhh, I know.  You read the word “swatching” and groaned.  Nobody likes to swatch and we’ve all read those notices at the start of patterns that nag us to “take time to check gauge!”  But when it comes to hand-dyed and variegated yarns, swatching tells you a lot more than just your stitches per inch.   Let me walk you through four more reasons to swatch your hand-dyed yarn…

Reason 1:  To Check Your Personal Rule of Thirds

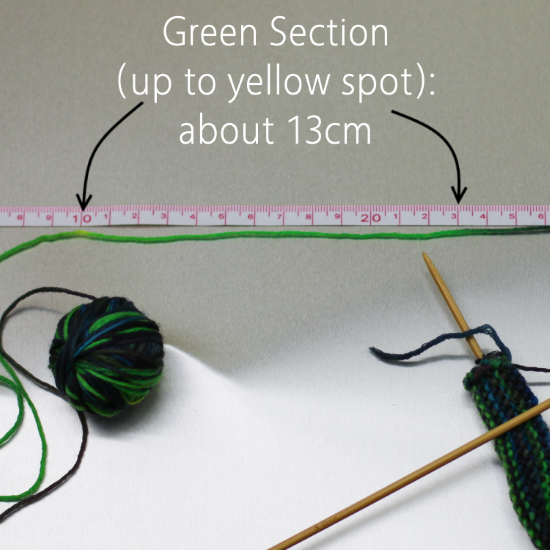
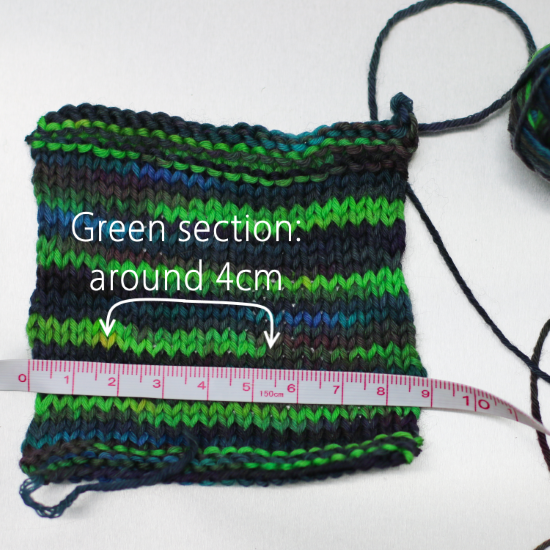
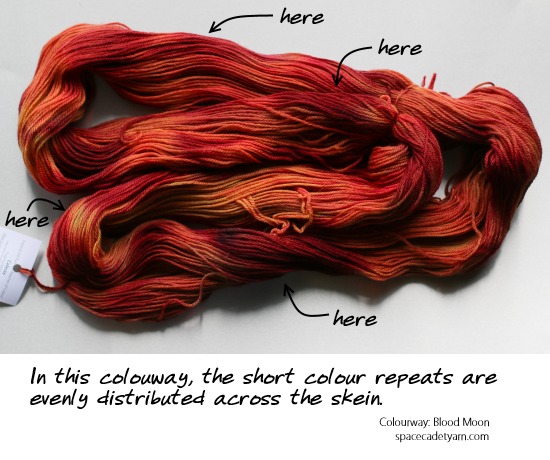
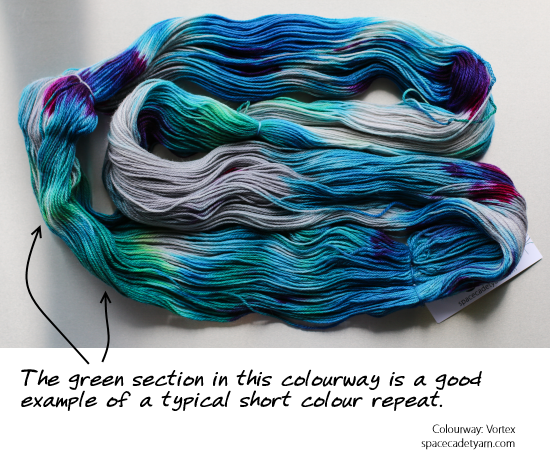
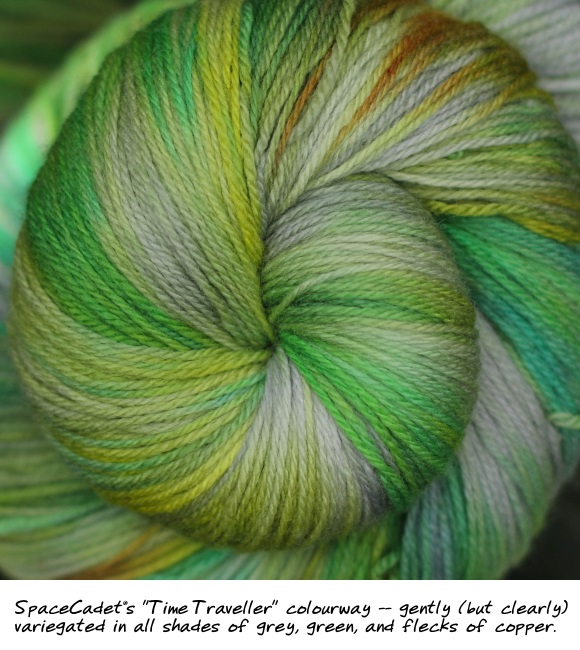
As I explained in my last post, the length of your yarn knitted up is generally around a third of the length of your yarn laid out straight.  This means that, as you look at your opened-up skein, you know that each colour repeat will actually be about  one third as long in the final knitted fabric.

Blue section knitted 550

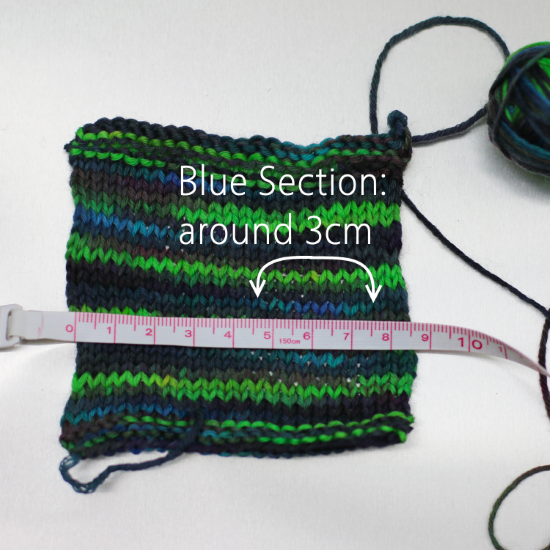
But, we all know that every knitter’s gauge is different so, depending on the thickness of the yarn, the size of your needles, and whether you knit tightly or loosely, your “rule” might actually work out something other than thirds.  You may knit to a Rule of Fourths, or a Rule of Two-and-a-Halves …or something else entirely.

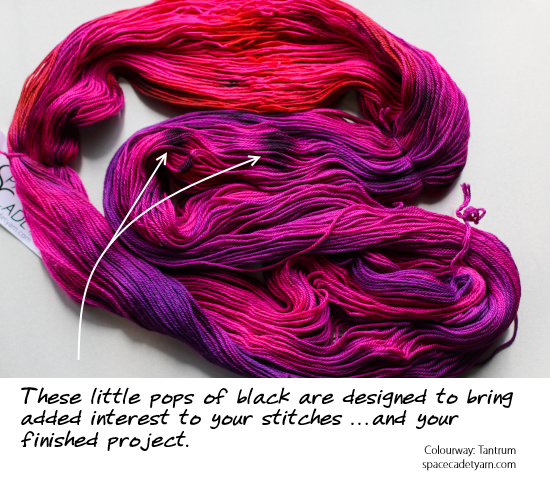
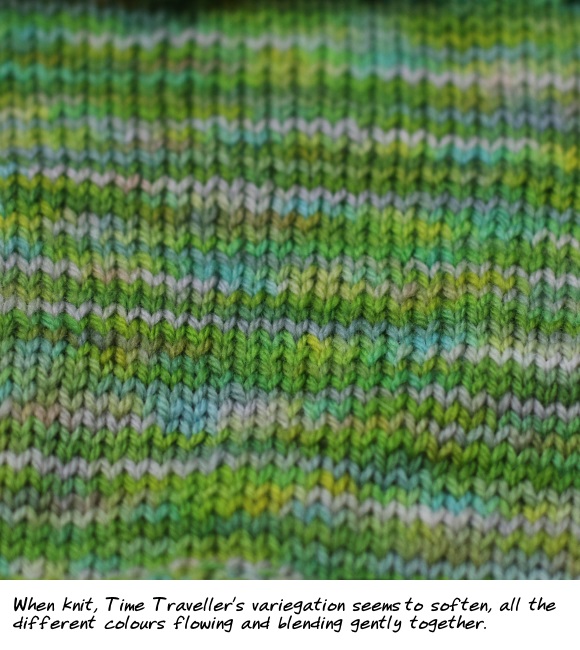
Knowing your personal rule will help you to better visualise how this colourway will work in your pattern.  You’ll know whether that small section of purple will be a little streak or just a tiny pop.  And you’ll know if the long sections of yellow are going to stretch out too far or look just right.

And if you want to avoid pooling (or you want to encourage it!), knowing your own Rule of Thirds for this particular yarn allows you do the calculations you need to get effect you want.

Reason 2:  To Check for Pseudo-Striping

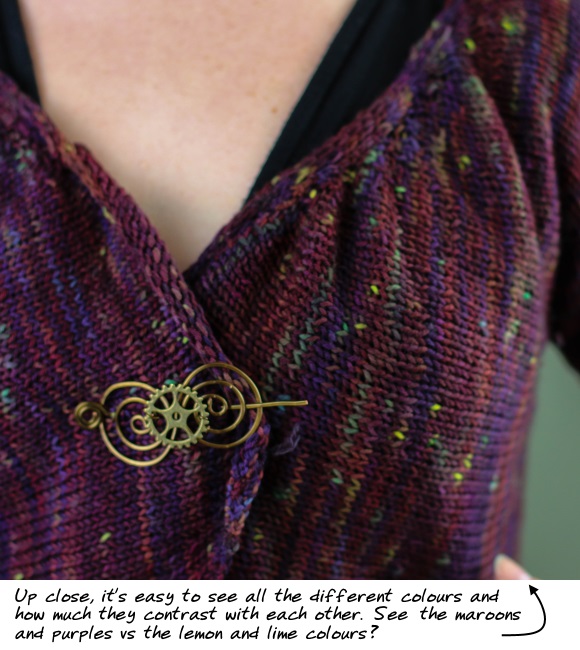
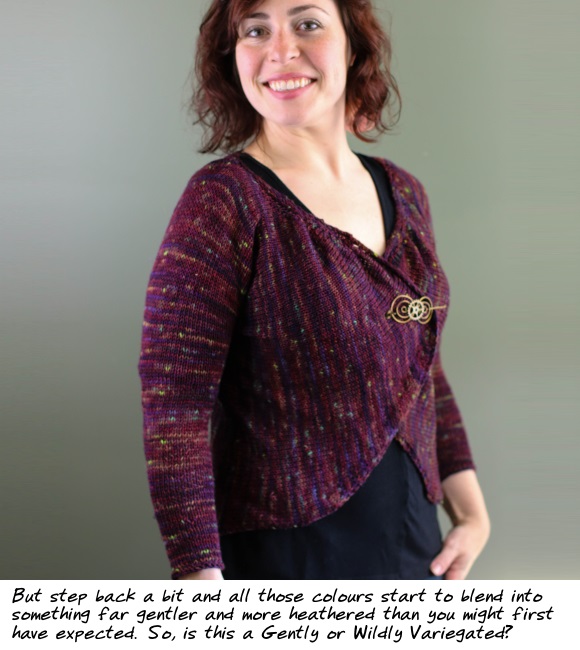
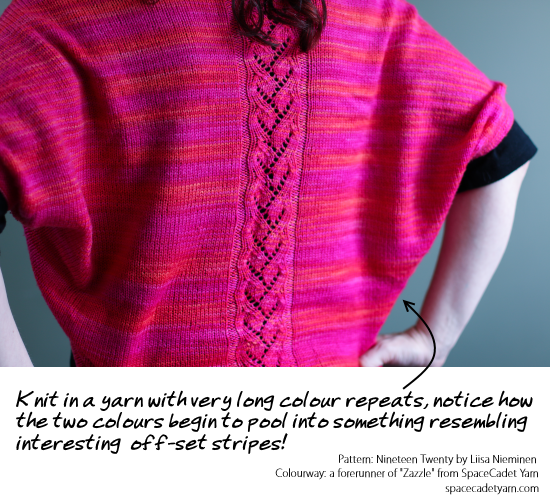
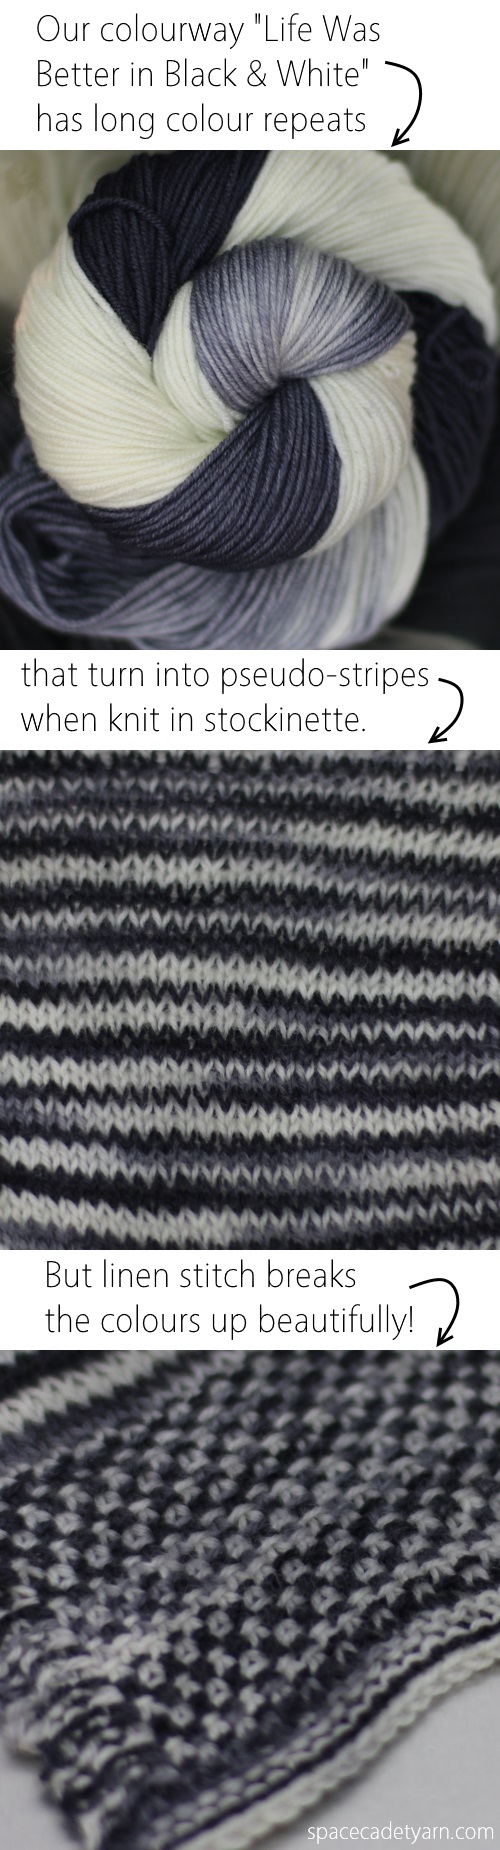
Some variegated colourways are do something that I call “pseudo-striping”.  Now, I’m not talking about self-striping yarn — that’s a completely intentional effect achieved through a special dyeing technique.  Pseudo-striping happens when you have very long (and usually simple) colour repeats knitted into a very plain stitch (such as stockinette).  When those two things come together, the repeats can start to stack on top of one another in a way that creates long pools of colour that look a little like stripes.  Take a look at the shrug below to see what I mean.  In truth, these aren’t really stripes (if you look, they actually change colour across the length of the row) but they give that impression nonetheless.

Long Colour Repeats in Knitting

Now, I happen to love this effect but, if it’s not what you’re after, swatching gives you the chance to spot it and make changes before you commit to a pattern.

The easiest way to avoid pseudo-stripes is to go for stitchwork that break up the horizontal stretch of those colours.  Stitch patterns with slipped stitches, yarnovers, or cables (faux or real) will do work wonders (see how the striping seems to disappear in the center lace section of that shrug above?).  Even garter stitch can do the trick, because of the way it hides every other row.  And the only way to find out is to get your needles out and swatch!

pseudo-striping-and-how-to-avoid-it

Reason 3:  To Check for Clown Barf

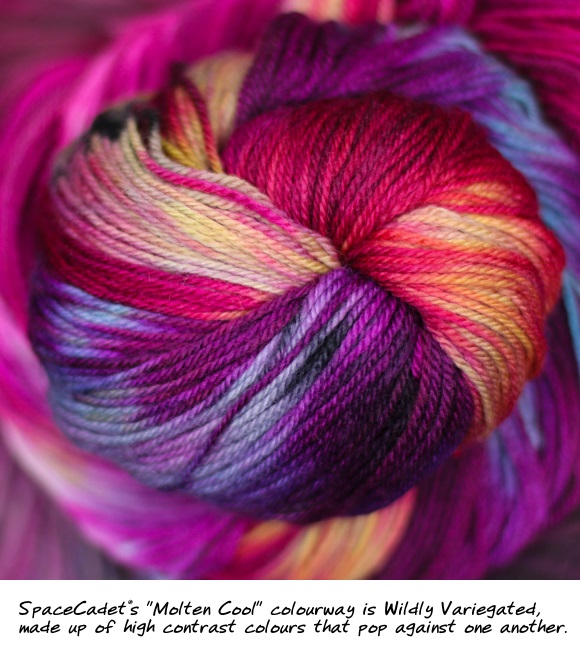
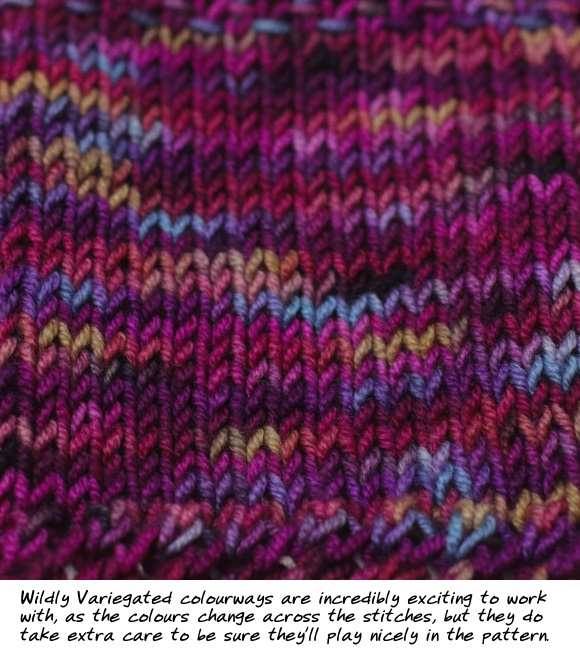
“Clown Barf” is the knitted result of those yarns that have sooooo many different colours going on at once that it just doesn’t work.  Usually (but not always) in rainbow colourways, they look simply amazing in the skein but somehow end up bitty and jumbled and just too-crazy once they’re off the needles.  But the thing is, it can be hard to tell which skeins will turn into clown barf.  Sometimes the ones you think will, don’t…  and the ones you think won’t, do.

The answer is swatching.  Get that yarn on your needles and see how the colours are going to redistribute themselves.  You’ll know pretty quickly if what you’ve got is clown barf.  And if it is, what do you do?  First, don’t despair!  The solution is simple: choose a pattern with stripes, and alternate your crazy-coloured yarn with a semi-solid in a coordinating colouway.  The stripes will break up your variegated before the colours reach critical mass, allowing the semi-solid sections to turn each variegated stripe into a fabulous pop of colour — instead of an all-over assault on your senses.

Reason 4: To Check for Colourfastness

You know that when you knit a swatch in order to check your gauge, you have to wet and block it as you would the final finished object.  That’s what ensures your gauge is really accurate for the garment you’ll ultimately be wearing.

But wetting your swatch is also important because it gives you a heads up if your yarn isn’t actually colourfast.  Now, most yarns are colourfast, be they commercially dyed or hand-dyed, but if you happen to get a rare one that isn’t, that’s not something you want to find out after you’ve spent 40+ hours knitting your masterpiece!

Sometimes folks are under the impression that hand-dyed yarns are more prone to colourfastness issues, but they are not.  Any good hand-dyed yarn from a reputable dyer will be just as colourfast as any commercially dyed yarn.  At SpaceCadet, we carefully soak and rinse every one of our skeins to check for dye run-off.  On the very rare occasion that any dye comes out, the yarn goes immediately back to dye room.  I’m not happy until the rinse water runs crystal clear.

But mistakes happen — for hand-dyers and commercial outfits alike.  A few years ago, a friend made a blanket in navy blue and white stripes out of a very well known commercial yarn (a brand so popular that you’ve probably used it yourself).  When she bound off and finally washed the finished blanket, the navy bled all over the white.   …And she was heart broken!

But she had a few skeins left over that she still wanted to use, and so she asked me if I could try to set the dye on them again.   When I set the skeins to soak in clear water, the navy started pouring out in billowing clouds of blue.  After a few moments, the  water was so dark I couldn’t even see the yarn anymore.  In all honesty, I imagined there had be some sort of advanced-chemistry reason that the dye hadn’t set — something too technical for me to understand — but I went through my regular process anyway and treated the yarn exactly as I treat my own skeins.

setting-the-dye

And when I rinsed it afterwards…    the water ran clear!  My friend knit the rest of her skeins safe in the knowledge that this project wouldn’t be ruined.  And I learned that any yarn — from dye houses large or small — can end up with colourfastness issues if the yarn is not checked properly during rinsing.

But test-wetting your swatch will let you know if that’s going to be a problem, long before you cast on your project — and save you from some serious heartache if it is.

So… Swatching Really IS Worth the Effort!

There you go — even though it’s a pain and even though we all really want to cast on right now, when it comes to hand-dyed and variegated yarns, nothing beats swatching for really making the most of your colourway.  There’s so much more to it than just getting gauge!

So, now it’s your turn.  Have you tried swatching for all these different reasons?  Or are some of them new to you?  Did swatching improve your results with your hand-dyed yarn?  Or are you so devil-may-care that you just cast on and let the yarn do whatever it wants?  Come over to the SpaceCadet Ravelry group and share your experience!


The InterStellar Yarn Alliance is Open for Subscriptions!

Want to come with SpaceCadet on a colour adventure?  That’s exactly what the Yarn Alliance is all about!

isya-quote-2-550

ISYA Quotes 2016.03

The InterStellar Yarn Alliance is your a chance to dive into amazing exclusive SpaceCadet colourways and share it with a fabulous community of folks who are just as excited as you are!

Subscriptions available from Sept 9-24 ONLY

Click here to grab your spot!

So, what do you get when you join?

…beautiful yarns, colourways you might never have dared try but suddenly realise you love, and some seriously fabulous gifts!

As a member of the InterStellar Yarn Alliance, you’ll receive a fabulous parcel delivered to their door every other month, containing:

  • SpaceCadet ® yarn (light to medium weight) in an exclusive Yarn Alliance colourway (guaranteed not to be offered on the SpaceCadet® website for at least 6 months)
  • A great Yarn Alliance gift tucked into every parcel!
  • The SpaceCadet’s Log exploring the inspiration for each colourway.
  • The InterStellar Yarn Alliance newsletter with periodic special offers exclusively for members.
  • A 15% off coupon every six months
  • And your entry to an awesome community of club members who share pattern ideas, cheer you on, and make our activities so much fun!

isya-quote-3-550

Plus Get a Coordinating Colourway!

Colours this gorgeous deserve companions, don’t you think? So each month, you have the opportunity to get a second colourway that we design to coordinate beautifully with the first, so you can create an even more amazing project. Usually a semi-solid or a gently variegated, you can use it to create stripes, a contrasting panel, or to go where-ever your creativity takes you!

And Sweater Quantities!

One gorgeous skein just isn’t enough? You also have an exclusive opportunity to order more skeins custom-dyed in the latest club colourway. You’ll receive an email with all the details about a week after your parcel goes out — and then all you have to do is pick your project!

isya-bonus-colour-1-550

We’d love to have you aboard!  Click here now to get your spot in the Yarn Alliance!

Reading Hand-Dyed Yarn: The Rule of Thirds

Reading Hand-Dyed Yarn: The Rule of Thirds

If you’ve been following my series on understanding hand-dyed yarn, you know by now that the most important step is to open your skein up, and you know the basics of how to read your colour repeats, and you can twist your skein back up like a pro.  So far, so good!

How to Read Your Hand-Dyed Yarn: The Rule of Thirds

And today I’m going to share a second step in reading your colour repeats — one that gives you a really handy benchmark that you can use to very quickly visualise how those colours will work up in your knitting.  So if you’re holding an open skein in our booth at a show (or maybe at your LYS, — just don’t forget to check it’s ok to open it), and you’re looking for all the colours that might be hidden inside the twist, assessing whether the yarn has got mostly long repeats or short, there’s one simple rule you want to keep in mind…

The Rule of Thirds

Actually, I totally made that rule up.  The real rule of thirds is a photography term, meaning that photographs are usually more dynamic if you place the subject slightly off-center, a third of the way in from one of the edges.  But the idea of thirds is a real thing when it comes to knitting as well and it’s this:

The length of your yarn knitted up is generally around a third of the length of your yarn laid out straight.

To illustrate this, I grabbed a random leftover Mini-Skein that has some very distinct colour repeats and knitted up a quick swatch.  As I did so, I measured the colour repeats before they reached my needles, and then I measured them again in the knitting after I’d soaked and blocked the swatch.  Here, have a look at what happens with the bright blue section of the colourway:

How to Read Your Hand-Dyed Yarn: The Rule of Thirds

This is Oriana, a fingering yarn, knit on 3mm needles (somewhere between a US 2-3).  Stretched out, the bright blue section of yarn is roughly around 9 centimeters long.  Knitted up into stockinette stitch, the same blue section measured around 3 centimeters.  The Rule of Thirds holds true!

How to Read Your Hand-Dyed Yarn: The Rule of Thirds

What does this mean for you, holding your open skein of yarn in a show booth or a shop?  It means you can very quickly look at the colour repeats and, by imagining them at a third of the length you see in the skein, have a basic-but-reliable idea of how they’ll work up in your knitting!  And once you get in the habit, it becomes second-nature — at just a moment’s glance you can pretty accurately “see” your colourway knitted up.  I find it super-helpful when I’m quickly sorting through skeins of hand-dyed to find one that will work with a pattern I have in mind.

Guidelines and Caveats and Disclaimers

Now, you need to know that, just like all simple rules, there’s actually much more to it.  The knitted length of your yarn will of course depend on your particular gauge, the needles you choose, your stitch pattern, and lots of other variables.  The Rule of Thirds applies best when you:

  • choose a needle size that is traditionally recommended for the weight of your yarn — so smaller needles for lighter yarns and larger needles for heavier yarns (click here for the Craft Yarn Council’s recommendations).
  • work in stockinette stitch — as soon as you introduce more complicated stitches, you alter the amount of yarn that’s used and start to move away from simple thirds.
  • And while this rule is handy for knitting, it doesn’t really apply to crochet at all (I’m sorry, crocheters!)


Establishing Your Own Rule

Ok, so what do you do if your gauge isn’t “typical”?  Or you want to knit fingering on size 10 needles?  Or your stitch pattern has a bunch of slipped-stitch-cabled-yarnovers (go you!)?  Or you crochet?  Well, there’s a few things you can do to adapt this rule to your situation.

How to Read Your Hand-Dyed Yarn: The Rule of Thirds

The first is knit a gauge swatch in stockinette, measuring as you go just like I did, and see what your personal rule is for your own natural gauge.  Check and see if you naturally knit to the Rule of Thirds.  Or maybe you knit more to a Rule of Fourths… or Two-and-a-Halves…  or something else.  It doesn’t really matter what your natural gauge is, so long as you know it and have it in mind when you open up a skein of hand-dyed and start looking at the colour repeats.

How to Read Your Hand-Dyed Yarn: The Rule of Thirds

And that applies to crocheters as well — go grab a skein of distinctly variegated yarn and work up a swatch in whatever stitch you most often use.  Measure the colour repeats before they reach your hook, and then measure how far they go across your stitches once you’ve crocheted them into the swatch.  You can even test it over a couple of different stitches.  Once you have your measurements, you’ll know what your personal rule is for reading your hand-dyed yarn.

Ok, but what if your pattern isn’t in stockinette?  Well, that’s a little trickier.  If you already own the yarn, then you just knit a swatch in the stitch pattern and see how it works with the yarn’s variegation.  But if you’re on the hunt for the right yarn and really want to know exactly what your Rule will be for that stitch pattern, then the best thing is to knit the pattern in a test yarn — measuring length as you go — and then use that knowledge to establish your Rule of Thirds/Fourths/Whatever so you can go out and read colour repeats to find the right yarn for your pattern.

Now It’s Your Turn!

Now that you know about the Rule of Thirds, you can start applying it right away!  (Even if your personal rule is not quite thirds, it’s still going to be fairly close).  So go into your stash of variegated hand-dyed yarns and start exploring.  Open up a few skeins and see if you can imagine how the colours will work together when they’re a third of the length in the skein.  Grab some of your Mini-Skeins and cast on a few quick swatches to see the colours worked up.  Compare long repeats against short repeats.  And look for those tiny pops of colour (like the yellow in the images above) to see how they work up as well.

Once you have the Rule of Thirds in your head, reading your skeins takes on a whole new dimension.  I’d love to hear how it helps you understand those beautiful, seductive, and sometimes intimidating hand-dyed colourways!

How to Untwist and Retwist a Skein

How to Untwist and Retwist a Skein

A few weeks ago, I shared the importance of untwisting your skeins in order to understand how the colourway will behave.  When it comes to hand-dyed yarn, seeing the whole colourway is absolutely crucial.  And the feedback I got on that was wonderful!  But one question I got again and again was, “How do I twist my skein back up again so it looks like it did before?”

How to Untwist & Retwist a Skein -- Learn how to Untwist and Retwist your hand-dyed yarn like a pro!  (Twist Skein)

Twisting a skein is really very simple but the reason people get hung up on it is because it takes practice.  Just like learning to knit, twisting up a skein feels downright awkward the first time (or two… or three..) that you do it.  But keep at it and, before you know it, your fingers will develop a little muscle memory and you’ll be twisting up skeins like nobody’s business.

And, just like knitting, it’s a really hard thing to describe with words, so we’ve put together a quick video to show you how it’s done.  Before you watch it, though, here are a few pointers that might help the next time you feel like you’re twisting your yarn into a big knot instead of a pretty skein…

Tips for Retwisting a Skein of Yarn

  1. Put both hands in the skein and pull it good and tight before you start twisting.  Unless it’s something really delicate, like laceweight, it’s ok to give it a nice thwack.
  2. Make sure the tag or a choke-tie is at the center of the skein.  That comes in handy when you’re start folding the two ends together.
  3. Twist using one or two fingers and get it tight.  I always go until my fingers are just starting to complain a little, and then I know I’ve got the skein twisted tightly enough.
  4. When you catch the middle between your knees (or on your elbow, or whatever works), that extra tightness is what makes it twist back on itself.
  5. Once you’ve folded the one end over the other, you might find it still doesn’t look very neat.  If it’s bunching up, pull the twist manually along one side of the skein so the tension evens out.
  6. If you have a few stragglers or choke-ties sticking out just a little, it’s ok to tuck them into the twist.

Want to see it in action?  Here you go!


(Can’t see the video? Click here)

Oh, two other quick things…

  • On untwisting skeins: Just remember, if you don’t (yet) own the skein, it’s always polite to ask before you untwist.
  • On twisting skeins: One thing I learned from writing that blog post a couple of weeks ago is how many people thought our skeins are twisted by machine.  Nope, they are hand-twisted!  Every. single. one.  In fact, I don’t know any  indie dyer who uses a machine to twist their skeins.  When you buy hand-dyed, it really is all made by hand! 🙂
How to Read Your Hand-Dyed Yarn’s Colour Repeats

How to Read Your Hand-Dyed Yarn’s Colour Repeats

Last week, I gave you the first and most important step to understanding your skein of hand-dyed yarn: opening it up.  And because we’re constantly twisting and untwisting skeins here in the studio, it seems like a really simple step to me, but I know from our experiences at yarn festivals and trunk shows that it is something a lot of people are reluctant to do.  But when it comes to hand-dyed yarn, there’s simply no better way to really understand what you’re going to be knitting or crocheting with than opening it up and having a good look.

How to Read a Hand-Dyed Yarn's Colour Repeats

So now, with that first step taken, what are you looking for?  What’s the magic inside the skein that will tell you how the colourway will behave?  There are several things to look for and today I’m going to cover the most important: the length of the colour repeats.

What are Colour Repeats?

Because hand-dyed yarn is usually dyed in the skein with the yarn looping around in circle, the colour we apply to each area of the skein hits all (or at least several) of the strands at that point in the circle.  When you are knitting or crocheting with it, the colours will repeat as you work your way around the circle again and again.  Each change of colour is refered to as a colour repeat, and its the length of these repeats that are so important to understanding how a hand-dyed colourway will behave.

Bonus info: the exception to this is single-skein gradients.  These are dyed using a different technique that makes the colour change slowly from one end of the skein to another.  So while the colours don’t repeat the way they do in most hand-dyed yarns, the colour changes are still referred to as colour repeats.

What about Semi-Solid Colourways?

For the most part, colour repeats apply to variegated and tonal yarns more than semi-solids, because they contain multiple colours that play off each other.  But where this does apply to semi-solid skeins is in the variation of the depth of shade — the yarn will have taken the colour more intensely in some sections of the loop than in others.  Think of those as colour repeats and you’ll get a better understanding of your semi-solid too. (Need a refresher on semi-solids vs solids? Click here)

There are several types of colour repeats that you’re looking for: long repeats, short repeats, and pops of colour.  So open up your skein of hand-dyed yarn, lay it out so you can view the whole loop, and let’s see what we’ve got!

Long Repeats

There’s no objective measure of what qualifies as a long repeat, but I’d say anything that is a third of the loop or longer counts.  Long repeats often stretch to one whole side of the skein (so, covering half the yarn) or sometimes even as much as three-quarters or more.    A skein can have a single long repeat of just one colour, or it may have several colours that each are long repeats, and those can also be intermixed with short repeats as well.  Take a look at this skein in our colourway “Flow“.  Though it has some shorter splotches of colour, the underlying green section is a very long repeat — stretching to well over half the skein.

Long Colour Repeats

The longer the repeat, the more it will stretch out in your knitting, forming a long line of colour.  Depending on the diameter of the item you’re making, that could begin to look like stripes, either where the colour stacks row on row, or where it pools more on one side than the other.  This shrug below is a great example.

Long Colour Repeats in Knitting

But here’s something interesting — do you see how the “striping” seems to disappear in the lace panel running down the center?  Where plain stitches like stockinette allow longer repeats to stretch out, patterns that contain more complicated stitches such as yarn overs and slipped stitches break up those longer colours and can help to even them out.

Crochet does very different things with variegated yarns and their colour repeats, because crochet moves the yarn both vertically as well as horizontally.  So it won’t necessarily stretch the colour out the way knitting can but, regardless, the longer the repeat, the larger that section of colour will be within the stitch pattern.


Short Repeats

Again, there’s no one measure of what qualifies as a short repeat, but I’d call any colour section that stretches for less than a quarter of a skein’s loop as a short repeat.  Sometimes those smaller sections appear evenly across the whole skein, as in our colourway “Blood Moon“, and sometimes they appear only here and there, like the green in “Vortex“.  Sometimes they blend gently into the next colour, and sometimes they have clearer edges.

Short colour repeats 3Short colour repeats 2But regardless of how they’re laid out, colour in a short repeat is not going to last long across your stitches before it switches again to the next colour.  When those changes happen evenly or frequently, the resulting fabric often comes out with watercolour-y effect.  When it happens just a few times in a skein, the result can be either pops of a contrasting colour or, as with the orange section of our colourway “Headstrong“, a heathered effect.

Short colour repeats 1

Pops of Colour

When you have really little sections of colour in a skein, these are what I think of as “pops”.  In truth, they’re just short colour repeats like the ones above, but they’re much much smaller, meaning the colour won’t last more than a few stitches when you work it up.  Whether they’re in a contrasting colour or a coordinating shade, the effect can be spectacular.

Scroll back up to the picture of our colourway “Vortex” and check out the little sections of magenta — those are a great example of a pop of colour.  Or look at the quick splashes of black in “Tantrum” below.  Colour pops like these can make your stitches super-interesting and your final project really eye-catching.

Pops of colourOn Your Way To Reading Your Skein!

Now it’s your turn!  Go grab a skein from your stash, open it up, and look at the repeats. Does it have a few predominant shades that span most of the skein?  Or are there lots of short bursts of colour?  Do you see little pops?  Being able to look at your skein and identify the colour repeats is such a help to understanding how the colourway will work in your knitting and crocheting!   Whether they a long repeats, short repeats, pops of colour, or a combination of all three, each hand-dyed skein is unique and the only way to understand it is…  to open it up and see what you’ve got!


Get Our FREE eBook!The Folks on our Mailing List get More!

If you found this post useful, you’ll want to get on our mailing list. Each week(ish) we send out a newsletter packed with all the latest that’s happening in the world of yarn, plus pattern picks, our pop-quiz, and more! And, when you join the list, you…

Get Our FREE eBook with Great Tips & Hacks from the Top Indie Designers!


The InterStellar Yarn Alliance Opens on Tuesday Sept 6!

Want to come with SpaceCadet on a colour adventure?  That’s exactly what the InterStellar Yarn Alliance is all about!

Join our premier yarn club to come with us as we explore the furthest reaches of colour — in gorgeous yarns dyed in exclusive colours that you can’t get enough of, and shared with a wonderful community of fellow club members who are all part of the adventure too.  Plus beautiful coordinating skeins, our awesome club gifts, and a 15% coupon.

BUT WAIT — THERE’S MORE!!! We always give first dibs to the folks on the club mailing list, so if you want the chance to grab a spot before anyone else, just click here and get on the club mailing list!


Understanding Colour: Variegateds, from Gentle to Wild

Understanding Colour: Variegateds, from Gentle to Wild

Last week we talked about the different meanings of the colour terms “solid”, “semi-solid”, and “tonal” — all of which refer to yarn dyed in a single hue.  But so often the yarns that really send our pulses racing are the multi-hued colourways — layer upon layer of fabulous colour, almost glowing in our hands as we turn them over and over to catch every last shade.  These are variegated colourways and, beautiful as they are, they can be intimidating.  But there are different types of variegateds and, once you realise the differences, they become much more approachable.

Understanding Colour -- Variegateds from Gentle to Wild

So first, let’s define what we’re talking about.  The straight-up definition of a variegated colourway is any colourway that contains more than one hue (colour). So, going back to last week’s post, if a yarn contains light kelly green and mid-kelly green and dark kelly green, it’s not variegated, it’s tonal because the hue of all the greens is the same.  But if a yarn contains a yellow-green and a blue-green as well as the kelly green, now it’s got mutiple hues (colours) and that makes it variegated.  To put it very simply: in a variegated colourway, the colour varies.

But there’s far more to “variegated” than just that simple definition.  Here at SpaceCadet, we tend to divide our variegateds into two categories: Gently Variegated and Wildly Variegated, and the good news is that they are exactly what they sound like.

Gently Variegateds: The Easy-to-Love Variegateds

Gently Variegated colourways are low contrast — their colours blend and flow into one another.  Think of our colourway Time Traveller, all shades of green and gray and gentle flecks of copper.  There are actually a whole bunch of colours in there — it’s definitely variegated — but none of them are jarring against each other.  In fact, although the yarn looks clearly variegated in the skein, when you knit it up, it’s quite startling just how much the different colours begin to flow into each other.  In fact, if you back up a few feet, it all begins to blend together as if it were hardly variegated at all.

SpaceCadet's Time Traveller

SpaceCadet's Time Traveller Knitted

Wildly Variegateds: The Bad Boy Colourways You Can’t Help Falling For

Wildly Variegated colourways are high contrast, containing hues that pop and sizzle against one another.  These are colours that jump around on the colour wheel, like the rust-and-blue combination in Windswept or the maroon-blue-yellow of Molten Cool. They’re incredibly exciting to knit or crochet with, the colours morphing and changing across your stitches.  But because they are high contrast, they can be high maintenance as well — there’s a push-pull element to the colours that means that, unlike Gently Variegateds, they may not play nicely together in plainer stitches.

SpaceCadet's Molten Cool

SpaceCadet's Molten Cool Knitted

So, so far, so simple.  Variegateds are colourways that contain more than one hue (colour).  Gently Variegateds are low contrast and Wildly Variegateds are high contrast.  Easy, right?  Yep, so let me complicated it just a bit.

When Gentles Go Wild (And Vice Versa)

There’s another element to what makes us perceive a variegated yarn as either Gentle or Wild, and this one defies the neat definitions we discussed above.  That element is the specific layouts of the colour repeats.  Or put more simply: how quickly and often the colour changes.

A yarn with long colour repeats will tend to look more variegated regardless of whether the hues are high or low contrast, simply because those long stretches allow the colours to separate in your knitting or crochet.  Depending on your project, they may stripe (or semi-stripe), pool, argyle, or create irregular flashes.  And when there are these sorts of large, distinct areas of a single hue which abut other distinct areas in a different hue, our eyes more easily perceive those colour changes and the colourway appears to have higher contrast (even when the two hues are similar).

And the reverse is true as well: when a yarn has many short colour repeats, it tends to look less variegated, regardless of whether its hues are high or low contrast.  Short, quick colour repeats create tiny pops of colour that sit right next each other in your knitting without such distinct edges.  Because of this, our eyes perceive even a wildly variegated colourway almost as a single, multi-hued colour (as if such a thing were possible) and the whole thing appears to be lower contrast.  Think of a heathered yarn, which may have anything from grays and browns to blues, greens, yellows, and perhaps even hot pinks — and yet, because the colour changes are many and often, they all blend together in a way that could almost be described as soft.

A Wildly Variegated colourway looks gentle thanks to short colour repeats

A Wildly Variegated colourway looks gentle thanks to short colour repeats (2)

Here’s a great example:  this is Mythos by Laura Nelkin, which my assistant Jade knit in a one-of-a-kind colourway we created last year.  If you look closely, you can see that the colours are actually very high contrast — there are maroons, purple-blues, dusty aqua, lime green, and even yellow.  By definition, it’s a Wildly Variegated colourway (and kind of sounds like it should be approaching the dreaded clown barf).  But, in reality, the short repeats give only pops of colour instead of stripes or pooling.  And the result is a colourway that is Gently Variegated and almost heathered — proof that even high contrast colourways don’t have to be so wild after all.

Now It’s Your Turn…

So now that we’ve gone over the terms, here are two exercises to give you hands-on practice in understand these different types of variegateds:

  • First, go to the SpaceCadet colourways page and scroll to the bottom to see our variegated colourways.  Mentally note which look Gentle and which look Wild to you, and then compare it what we consider Gentle or Wild by clicking on the buttons at the top (you’ll see them marked “Gently Variegated” or just “Variegated” — I left off the word Wild because I didn’t want to them to sound scary).  Remember that although there are clear definitions for both, there are no right or wrong answers — the perception of wild vs gentle is pretty subjective.  Even very high contrast colours can look Gentle if they are configured the right way; and low contrast colours can start to look a little Wild if they are allowed to pool, flash, or stripe.
  • And then, go and look at your own stash and see what you gravitate to.  Do you have a lot of yarns with colours that blend and flow into one another, or that are close on the colour wheel?  Or is your stash filled with yarns whose colours that contrast sharply with one another?  Open the skeins up to see how long the colour repeats are, and think about how is that going to affect the way the yarn looks when it’s knitted or crocheted.  Most importantly, how do you feel about the colourways in your stash?  Are you excited to work with them and see how they come out or are you a little intimidated by them?  Ultimately, whether Wild or Gentle, low contrast or high, the how we feel about the end result is what really matters.  But we’ll get better results from our yarn — and our yarn shopping — if we really understand what draws us to the yarns we love.

Next up in this series: a colourway that seemingly defies all these definitions… and what makes it so interesting.  I’ll be posting that sometime in the next week or so — don’t miss it!

Understanding Colour: Solids vs Semi Solids vs Tonals

Understanding Colour: Solids vs Semi Solids vs Tonals

An addiction to knitting and crocheting (raise your hand!) might seem like it’s all about the fiber, but it’s really as much about colour. And while lots of folks immediately get schooled up in yarn terms — fingering vs DK, wool vs acrylic, merino vs BFL — there’s a lot of confusion around colour. The terms can be muddling and matching up colourways to patterns can be downright perplexing. I can’t tell you the number of conversations I’ve had with customers at shows where we’re all using the same words (“semi-solid”, “variegated”, “tonal”…) but all at cross-purposes. And so today I start a series of posts to lift that confusion and explain colour terms for hand-dyed yarn.

Understanding Colour -- Solids vs Semi Solids vs Tonals


Ready to get started? First up, three words that sometimes get used interchangeably and sometimes to refer to completely different things: solids vs semi solids vs tonals. Here’s how we use them at SpaceCadet…


Solid Colours (and When a Solid is Not a Solid)


Solid colours are what commercial yarn companies create when they dye in a single hue. You look at a solid skein and you see one, even colour, without variation along the entire length of the yarn. And here’s the key about understanding a solid colour: in natural materials, it can only be achieved by dyeing the fibers before they are spun into yarn, which means it’s usually only larger commercial yarn companies that can create a true solid yarn.


Why? Because it’s the nature of dyeing that the colour is distributed unevenly in the dyebath — to varying degrees, of course. In some dyebaths it’s very obvious that the colour is uneven and in others barely perceptible, but it’s almost impossible to get dye 100%, totally and completely evenly distributed in the water — and therefore on the item being dyed. That means that there will be places where the dye adheres to the fibers more densely (eg, more intensely) than in others, and the result will look uneven.


Commercial solid yarns
But the big yarn companies are able to solve this problem by dyeing unspun fiber and then running it through huge blending machines and industrial carders before spinning it into the yarn. The process ensures that any uneven patches are redistributed and the resulting yarn is a beautifully even, solid colour. If you were to pick a commercial yarn apart and compare each individual fiber to another, you might be able to spot some variation, but the overall effect is a yarn in a solid colour.


Semi-Solid Colours (the Solids of the Indie Dyer’s World)
Semi-solid colours are, again, a single hue but this time showing off the natural variation that results from the unevenness of the dyebath. Semi-solids are what you get from hand-dyers — even when dyeing with a single hue, it’s almost impossible for an indie dyeing company to achieve a truly solid colour. Why? Because most indie dyers work with skeins that have been spun by a mill, which means they’re dyeing fiber that is already in yarn form and so, if the dye adheres to the yarn unevenly, there is no way to redistribute the colour to make it even.


And that’s the nature and the allure of hand-dyed yarn. Instead of looking for perfectly even colour, hand-dyed has intriguing depth and beautifully organic variation that makes each yarn truly one-of a kind. In a finished garment, semi-solids will look like a single colour from a distance, but reveal fascinating complexity up close.


Three Semi-Solids -- Tickled, Gobsmack, and Drizzle


Now, do I always faithfully refer to our yarns as “semi-solid”? No, I call them “solid” as often as not because, in regular conversation, it doesn’t make much difference. But if we’re being technical, as we are here, then all our single-colour skeins are semi-solids.


Tonals (and Here’s Where It Gets Tricky)


“Is this a tonal or a semi-solid?” is a question I get asked a lot. It’s often followed by, “Wait… what is a tonal exactly?” I’m not surprised, because the answer is a little technical, but let’s try to keep it simple here.


Headstrong -- a great tonal colourway


A colour tone is created by mixing a pure colour (a hue) with a grayscale colour in the range between black and white. So, if you have a pure green, and you mix it with black or an almost-black gray, you’ll get a darker version of that same green, which is called a “shade”. And if you take the pure green again and mix it with white or an almost-white gray, you’ll get a lighter version of that green, called a “tint”. In both cases, it’s still the same hue — the green isn’t any yellower or bluer — it’s just a darker or lighter. Together, the shades and tints (the darker and lighter versions) are the “tones”. Got it?


Tones -- pure hues, tints, and shades
So a tonal yarn is simply one that incorporates lighter and darker versions of the same colour in the one colourway. It doesn’t have any other hues — no yellower greens or bluer greens — just darker and lighter sections of the exact same colour.


Is that the same as a semi-solid? Well, in some ways, yes. At SpaceCadet, the yarn we dye starts out white(ish) so in those places where the dye doesn’t strike as intensely, what you’re getting is the colour mixed with the white of the yarn — which is a tint. But unless the undyed yarn also has naturally dark gray sections (and ours doesn’t), a typical semi-solid won’t contain any dark tones (shades). So the terms semi-solid and tonal are almost the same thing. Not quite but so close that, in day to day conversation, it probably doesn’t really matter — I tend to use them both without worrying.


Twisted and Tickled -- a good example of tone on tone


There you have it, three words that are often used interchangeably but actually have slightly different meanings. In day-to-day chit chat, the differences probably don’t matter much but, if you want to be as accurate and knowledgeable about the colour of your yarn as you are about its fiber content or construction, then it’s important to understand these details.


Now It’s Your Turn…
So now go and look at your stash — what have you actually got? Do you gravitate toward true solids or do you like the variation and intrigue of semi-solids? Can you find any true tonals, with both lighter and darker tones? Do you love the one-of-a-kind nature of hand-dyed semi-solids?


Up next in this series: understanding variegateds, from gentle to wild. I’ll be posting that sometime in the next week or so — don’t miss it!